
Your basket is empty
Tekden
Golf Simulator Lighting UK: The Complete Setup Guide (2026)
Golf Simulator Lighting: The Complete UK Setup Guide
Lighting is the most under-thought part of almost every golf simulator build, and the one that quietly ruins the most of them. People spend thousands on a launch monitor and a 4K projector, then light the room with whatever was already on the ceiling – and wonder why the image looks washed out, why the ball tracking drops shots, and why the whole thing looks nothing like the photos.
This guide covers what actually matters, with the numbers. We build and light simulators for a living, so where there is a real answer we have given it, and where the honest answer is “it depends”, we have said that too – including where we do not sell the product you need.
The one rule that matters most
Light the golfer, not the screen. Every other decision in this guide follows from that. A projector cannot produce true black – it can only fail to add light – so any stray light landing on your impact screen washes the image out and there is nothing you can do about it in software.
The Three Jobs of Simulator Lighting
Most guides treat simulator lighting as one problem. It is three, and they want different things from you. Get them muddled and you end up with a compromise that does none of them well.
| Layer | What it is for | What it needs to be |
| 1. Capture light | Letting a camera-based launch monitor see the ball and club clearly at impact. | Bright, tightly focused, flicker-free, aimed at the hitting zone only. |
| 2. Room light | Seeing where you are. Walking in, finding a club, not tripping over the mat. | Dimmable, and switchable separately from everything else. |
| 3. Accent light | Atmosphere, and soft indirect fill that does not hit the screen. This is where LED strip lives. | Indirect, even, dot-free, aimed at walls and ceiling – never at the screen. |
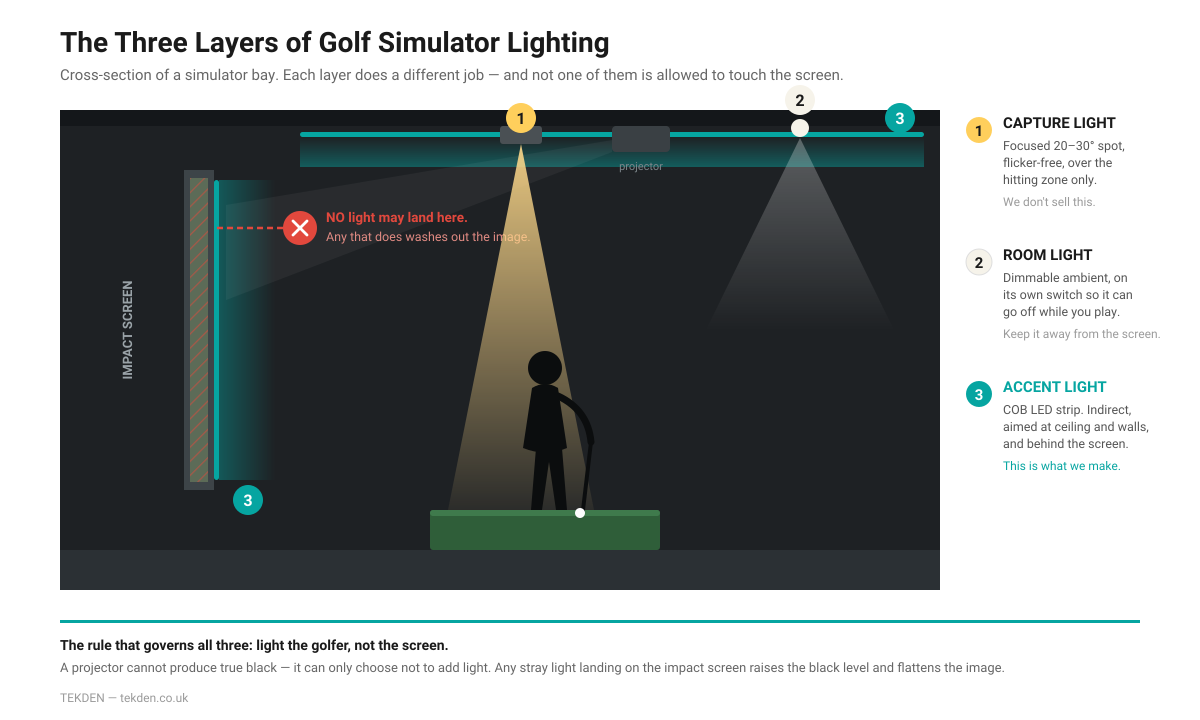
The three layers of simulator lighting. Only the accent layer is ours – and not one of them may touch the screen.
Layer 1: Capture Light (and Why We Do Not Sell It)
If you run a camera-based launch monitor – Uneekor EYE XO, Foresight GC3 or GCQuad, SkyTrak, Bushnell Launch Pro – it is photographing a golf ball travelling at 70m/s with an exposure measured in microseconds. It needs a lot of light in a very small place, and it needs that light to be perfectly steady.
What you want is a focusable spotlight with a 20–30° beam angle, mounted above and slightly behind the hitting zone, aimed down at the ball and away from the screen. Two units on a short track is the common setup, so you can cover both a left and right-handed stance.
We do not sell this product. LED strip is the wrong tool for it – strip produces a broad, soft wash, which is exactly what you do not want over a hitting zone. If you need impact lighting, buy a purpose-made simulator spotlight. Expect to pay somewhere around £150–£250 for a decent one in the UK. We would rather tell you that than sell you the wrong thing.
Flicker: The Part Nobody Tells You About
This is the single most common cause of a simulator that “randomly” misreads shots, and almost no lighting guide mentions it.
UK mains runs at 50Hz. Cheap LED fittings and cheap dimmers flicker in sympathy with it – typically at 100Hz, because the light pulses on both halves of the AC cycle. Your eye cannot see it. A camera shooting at 120fps or more absolutely can. What you get is banding across the frame, inconsistent exposure between shots, and a launch monitor that reads perfectly for twenty balls and then throws out a 340-yard 8-iron for no reason you can identify.
The same problem shows up on swing cameras. If you record high-frame-rate swing video and the footage has rolling dark bands through it, that is flicker, not a camera fault.
How to avoid it:
• Use low-voltage DC lighting (12V or 24V) with a proper constant-voltage driver, not 240V strip run straight off the mains.
• Avoid cheap mains dimmers on anything in the capture zone. If you want dimming, dim on the low-voltage side with a proper LED controller.
• Be sceptical of “240V LED strip” – it is cheap and convenient, and it is the worst possible choice in a room with a high-speed camera in it.
Colour Temperature: What Kelvin Actually Does to Your Image
Colour temperature is measured in Kelvin. Low numbers are warm and orange, high numbers are cool and blue. In a normal room it is a taste question. In a simulator it is not, because whatever colour your ambient light is, it tints the light bouncing back off your impact screen – and that shifts the colour of the projected image.
| Temperature | Effect in a simulator |
| 2700K – Warm White | Cosy, lounge-like. Throws a noticeable warm cast onto the screen. Fine for a bar or entertaining space; not ideal if image fidelity matters to you. |
| 3000K – Warm White | The domestic default. Comfortable, still slightly warm on screen. A sensible choice if the sim sits inside a living space. |
| 4000K – Natural White (our recommendation) | Neutral. No colour cast on the projected image, and still comfortable to stand in for two hours. This is what we fit in our own builds. |
| 6500K – Cool White | Bright and clinical. Excellent task light if the room doubles as a workshop or gym, but it can make the space feel cold and pushes the image blue. |
If you cannot decide, 4000K is the safe answer. If you want to hedge, an RGBW strip gives you a dedicated white channel plus the ability to change the room’s mood entirely, which is why it is the option most of our customers end up choosing.
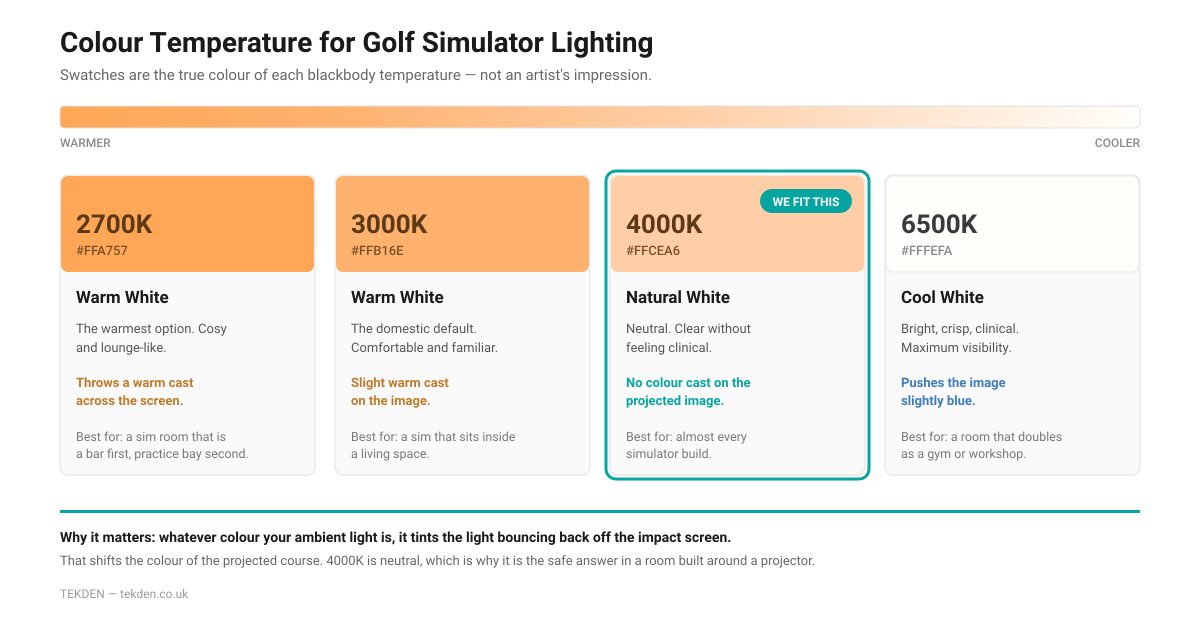
The true colour of each temperature. 4000K is neutral, which is why it is the safe choice under a projector.
CRI: The Spec Cheap Strip Hides From You
Colour Rendering Index measures how truthfully a light source shows colour, on a scale to 100. Budget LED strip is routinely CRI 70–80, and manufacturers rarely publish the figure because it is not flattering.
In a simulator, low CRI makes the room look flat and slightly grey, makes your turf look fake, and makes the projected course look duller than it is. Look for CRI above 90. It is the single easiest way to tell a serious strip from a cheap one, and it costs very little more.
Why COB and Not Standard LED Strip
Traditional SMD strip has individual LED diodes spaced along it. Look at it directly, or shine it along a wall at a shallow angle, and you see a row of dots and scalloped shadows between them. It looks like what it is: a strip of lights stuck to a wall.
COB – Chip on Board – packs the diodes far more densely and covers them with a continuous phosphor coating. The result is one unbroken line of light with no dots and no shadowing. In a simulator, where the strip usually runs around an enclosure frame at eye level and washes across a large flat surface, that difference is not subtle. It is the difference between looking installed and looking bodged.
It is also why COB is the strip type that gets recommended for simulator enclosures almost universally.
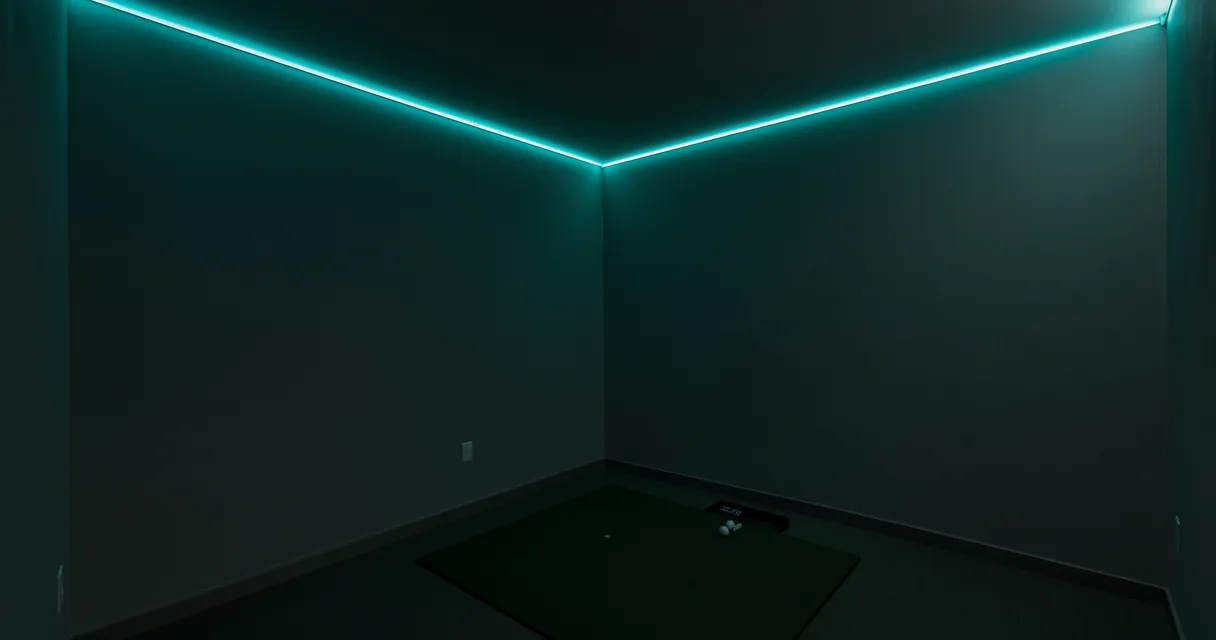
COB gives one unbroken line of light – no dots, no scalloping, even at close range.
How Much LED Strip Do You Actually Need?
Measure the run, do not guess it. For a full perimeter, the formula is 2 × (room length + room width). People routinely under-order by a third.
| What you are lighting | Typical run | Buy |
| A single feature run behind or above the screen | 4–5m | 5m |
| Outlining an enclosure frame (3 sides of a typical 4m × 2.5m enclosure) | ~9m | 10m |
| Ceiling perimeter of a small room (4m × 3m) | 14m | 15m |
| Ceiling perimeter of a typical sim room (5m × 4m) | 18m | 15m + extra, or drop to 3 walls |
Worth knowing: you rarely want strip on the screen wall anyway. Running three walls and leaving the screen wall dark is usually both cheaper and better looking.
Driver Sizing: The 80% Rule
This is where most DIY builds go wrong, and it is the reason we now sell lighting as complete kits rather than bare reels.
Your strip has a power draw per metre. Multiply it by your run length and you have your load. Now the important bit: never run an LED driver at more than about 80% of its rated output. A driver sitting at 95% load runs hot, ages fast, and is a common cause of strip that dims towards the far end or fails after a year.
The maths
Driver wattage needed = (watts per metre × metres) ÷ 0.8
Worked example. A 10m run of RGBW strip at 18.5W/m:
18.5 × 10 = 185W load
185 ÷ 0.8 = 231W – so you need a 240W driver, not a 200W one.
Run the same sum on any strip and length you are considering before you buy. If a seller offers you a strip and a driver as a bundle and the numbers do not clear the 80% rule, walk away – they either have not done the maths or they are hoping you will not.
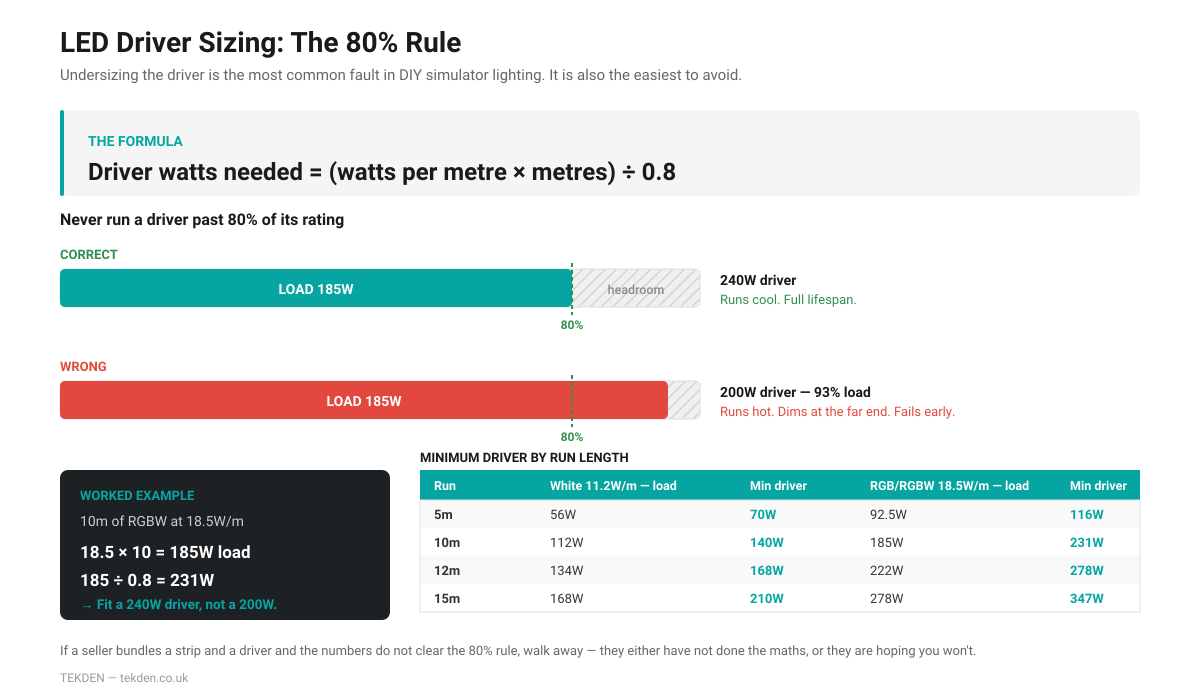
Work this out before you buy. Undersizing the driver is the most common fault in DIY simulator lighting.
Do You Need Aluminium Profile?
Not strictly. But it does three things, and two of them are not cosmetic.
- Heat. The channel acts as a heatsink. LEDs die of heat, and a strip stuck to a plasterboard wall has nowhere to dump it. Profile measurably extends strip life.
- Diffusion. The frosted cover turns a visible line of light into an even glow. Even with COB, a bare strip viewed straight on is glary.
- Finish. It is the difference between a designed installation and tape stuck to a wall.
Skip it only if the strip is hidden – tucked inside a coving, behind a pelmet, or above a bulkhead where you will never see the strip itself, only the light it throws.
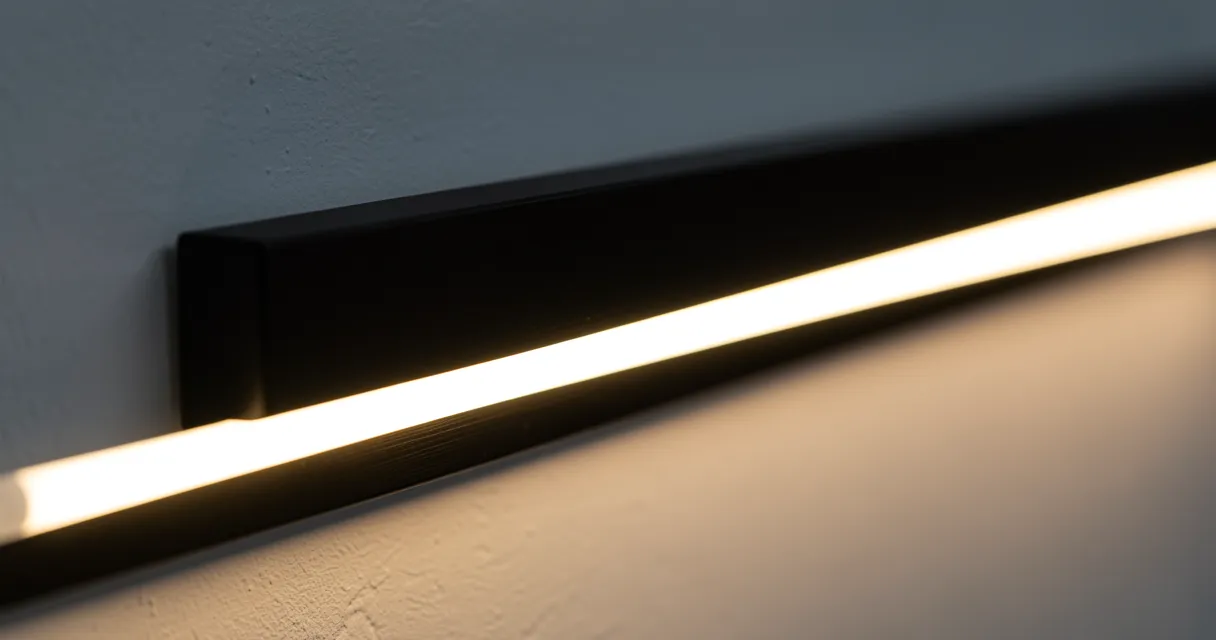
Aluminium channel and diffuser: heatsink, glare control and a finished look, in one part.
Where to Physically Put the Strip
- Around the enclosure frame, facing outwards or backwards. Washes the surrounding wall, frames the screen, throws nothing at the screen itself. The classic look.
- Ceiling perimeter, facing up. Bounces off the ceiling for soft, even indirect fill with zero glare. Very effective in a low room.
- Behind the enclosure, facing the wall. The “floating screen” halo effect. Cheap to do, looks expensive.
- Floor level along the side walls. Good for orientation in a dark room. Keep it behind the hitting position.
Never point strip at the impact screen, and never mount it where it sits in the projector’s throw path – you will cast a strip-shaped shadow across the course.
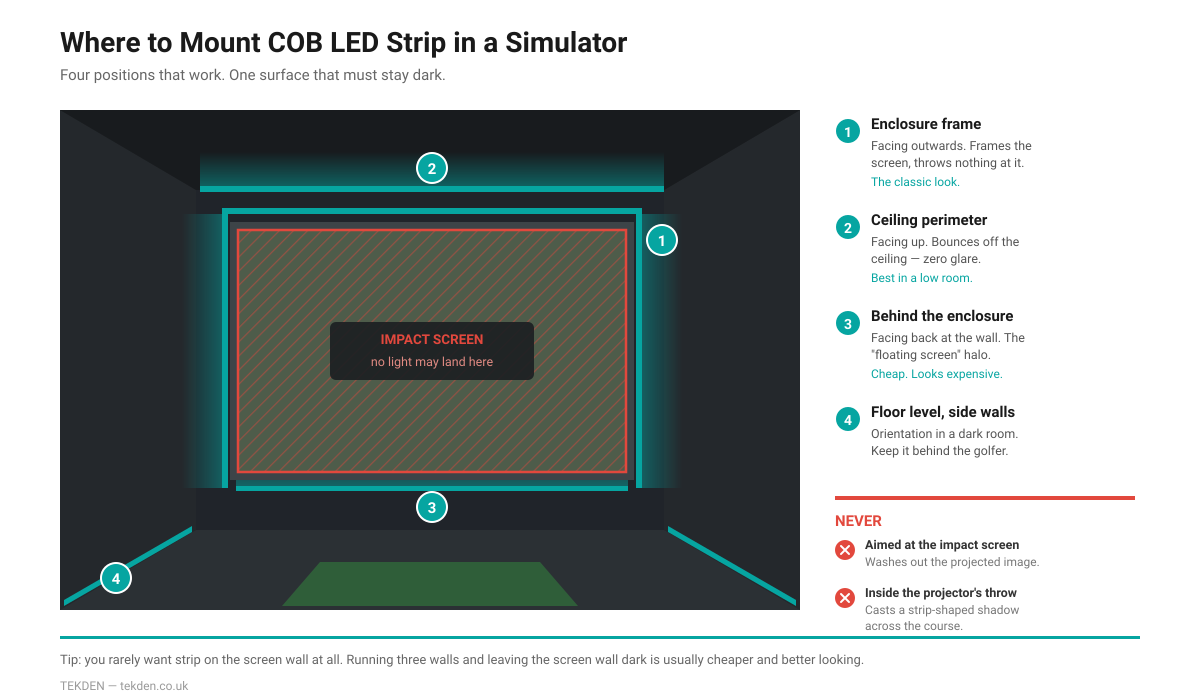
Four positions that work – and the one surface that must stay dark.
A Note on UK Electrics
Everything downstream of the driver is low-voltage 24V DC and safe to handle. The driver itself needs a 240V supply, and any new fixed mains wiring – particularly in a garage, outbuilding or garden room – falls under Part P of the Building Regulations. Plugging a driver into an existing socket is your business. Adding a new spur is an electrician’s.
Our Golf Simulator Lighting Kits
We got tired of customers buying a reel of strip from us and then coming back three weeks later with an underpowered driver and a controller that would not talk to it. So we stopped selling reels and started selling complete, correctly-specified kits – strip, driver sized to your run, controller, remote and cable, in one box.
White COB Kit
Single colour, CRI >90, four colour temperatures including our recommended 4000K. The straightforward choice if you want clean light and nothing else.
RGB COB Kit
Full colour mixing with app and remote control. Choose this if the lighting is purely for atmosphere and you have your white light covered elsewhere.
RGBW COB Kit
Colour and a dedicated true-white channel on one strip. One installation that does both jobs – and the one most of our customers pick.
Frequently Asked Questions
What is the best lighting for a golf simulator?
There is no single product – a good simulator uses three separate layers. A focused, flicker-free spotlight over the hitting zone for your launch monitor; dimmable ambient light for the room, on its own switch; and indirect COB LED strip for atmosphere and soft fill. The critical rule across all three is that light must fall on the golfer and the walls, never on the impact screen.
Will LED lighting interfere with my launch monitor?
Good LED lighting will not. Flickering LED lighting absolutely will. Camera-based launch monitors shoot at very high frame rates, and cheap mains-powered LED fittings pulse at 100Hz on UK electricity – invisible to you, very visible to the camera. The result is inconsistent readings and the occasional wild shot. Use low-voltage 24V DC strip with a proper constant-voltage driver, and dim on the low-voltage side rather than with a mains dimmer.
What colour temperature should golf simulator lighting be?
4000K natural white is the best all-round choice. It is neutral, so it does not throw a warm or blue cast onto the projected image, and it is still comfortable to stand under for a long session. Go warmer (2700K–3000K) if the room is a social space first and a practice bay second. Go cooler (6500K) only if you genuinely need bright task lighting.
Why is my projector image washed out?
Almost certainly stray light landing on the impact screen. A projector cannot produce true black – it can only choose not to add light – so any ambient light hitting the screen raises the black level and flattens the whole image. Check for daylight (blackout blinds are the single biggest upgrade in most rooms), downlights near the screen, and any LED strip pointed the wrong way. A grey impact screen also helps in a bright room.
Is COB LED strip better than normal LED strip for a golf simulator?
Yes, noticeably. Standard SMD strip shows a visible row of dots and scalloped shadows, which is obvious when the strip runs around an enclosure frame at eye level. COB uses a continuous phosphor coating to produce one unbroken line of light with no dotting. Given how much simulator lighting is seen directly rather than hidden, it is worth the modest extra cost.
How do I work out what size LED driver I need?
Multiply the strip’s watts per metre by your run length to get the load, then divide by 0.8 – never run a driver above about 80% of its rating. For example, 10 metres of 18.5W/m RGBW strip draws 185W, so 185 ÷ 0.8 = 231W, meaning you need a 240W driver. Undersizing the driver is the most common fault we see in DIY simulator lighting installs.
How much LED strip do I need for my golf simulator?
For a full ceiling perimeter, the run is 2 × (room length + room width) – so a 5m × 4m room needs 18 metres. Outlining a typical enclosure frame on three sides is around 9 metres. A single feature run behind the screen is 4–5 metres. Measure it rather than estimating; under-ordering by a third is extremely common.
Planning a Build?
Lighting is one part of it. If you are still working out the rest, these will help:
- Golf Simulator Room Ideas, Sizes & Setup Guide – getting the space right before you buy anything
- Golf Simulator Cost UK – what a full build actually comes to
- Best Golf Launch Monitors UK – and which of them are camera-based, which decides your lighting
- Screen Calculator – size your impact screen and throw distance
Or just talk to us. We build these rooms ourselves, and we would rather spend ten minutes getting your lighting plan right than sell you a kit that turns out to be the wrong length.
All fixed electrical installation work should be planned and carried out under the supervision of a suitably qualified electrician in accordance with BS 7671 and Part P of the Building Regulations.