Your basket is empty
How to Set Up a Golf Simulator in Your Garage (Without Losing Your Garage)
The garage is the most popular room in the UK for a home golf simulator — and for good reason. It’s usually the only space with enough ceiling height, enough depth for a full swing, and enough width for a decent-sized impact screen. But there’s one problem that stops most people from pulling the trigger: you lose your garage.
A traditional golf simulator enclosure is a permanent structure. Once it’s up, your car lives on the driveway, your storage gets displaced, and your garage becomes a single-purpose golf room. For a lot of households, that trade-off simply doesn’t work.
This guide covers how to set up a garage golf simulator that you can actually live with — including the retractable enclosure technology that means you don’t have to choose between your golf sim and your parking space.
What You Need for a Garage Golf Simulator
Before we get into the “how,” let’s cover the essentials. A complete garage golf simulator setup requires five core components:
- Impact screen and enclosure — catches the ball and provides the projection surface
- Launch monitor — tracks your ball and club data (Garmin, Foresight, FlightScope, SkyTrak, etc.)
- Projector — displays the simulation on your impact screen
- Gaming PC or laptop — runs the simulation software (GSPro, E6 Connect, etc.)
- Hitting mat — protects your floor and gives you a realistic hitting surface
Optional extras include lighting, speakers, and seating — but the five items above are the non-negotiables.
The component that defines your entire setup is the enclosure. It determines how much space you need, how permanent the installation is, and whether your garage can still function as a garage.
Garage Space Requirements: Will It Fit?
The first question everyone asks: is my garage big enough?
Ceiling Height
This is the make-or-break measurement. You need enough height to make a full golf swing without hitting the ceiling. The absolute minimum is 2.5m (8’2″), but 2.7m (9’0″) or higher is recommended for comfortable play with a driver.
The good news: most UK garages have ceiling heights between 2.4m and 2.7m. If yours is at the lower end, you may need to check clearance with your tallest club — but most golfers can swing a driver comfortably at 2.5m.
Width
Your enclosure width depends on the model you choose. Here’s a quick reference:
| Garage Type | Typical Width | Suitable Enclosure |
|---|---|---|
| Single garage | 2.4m – 3.0m | Vanish 9 (compact) |
| Standard double garage | 4.8m – 5.4m | Vanish 11 (3.1m wide) — most popular |
| Large double garage | 5.4m – 6.0m+ | Vanish 13H / 16 / 16H (3.7m – 4.7m wide) |
If you have a standard double garage, the Vanish 11 at 3.1m wide is the sweet spot — it gives you a full 4:3 projection area while leaving room to park a car alongside when the screen is retracted.
Depth
You need enough depth from the screen to your hitting position. The enclosure itself takes up about 1.5m from the wall (plus 20–30cm clearance behind). You then need approximately 2.5m–3m from the screen to the tee position, plus room behind you for your backswing.
Total depth required: approximately 5m–6m. Most UK garages are 5m–6m deep, so the majority will work.
The Problem with Permanent Golf Simulator Enclosures
Traditional golf simulator enclosures use a rigid frame — typically metal or PVC pipe — with an impact screen stretched across the front and side nets or baffles for ball containment. They work well, but they have one fundamental limitation: they don’t move.
Once installed, a permanent enclosure sits in your garage 24/7. That means:
- Your car lives on the driveway — exposed to weather, bird droppings and the occasional dent
- Storage space disappears — bikes, tools and seasonal items need a new home
- The garage becomes single-purpose — no more workspace, gym or kids’ play area
- Resale impact — some buyers see a permanent enclosure as a negative, not a feature
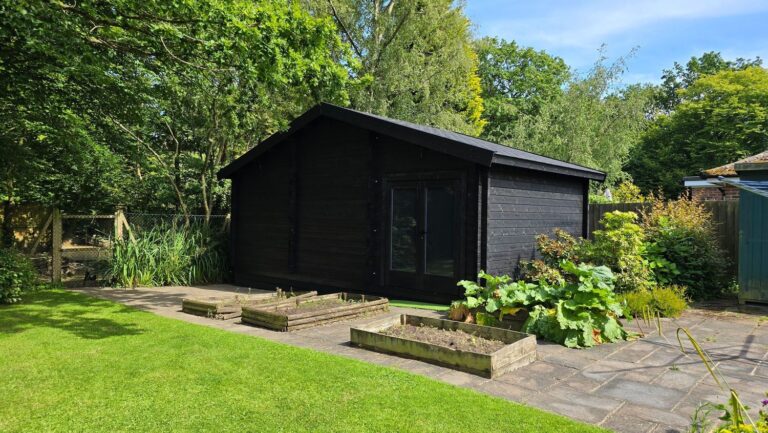
For dedicated golf rooms, outbuildings or golf simulator cabins, a permanent enclosure makes perfect sense. But for a shared-use garage, it creates a daily conflict between your golf hobby and your household needs.
The Solution: Retractable Golf Simulator Enclosures
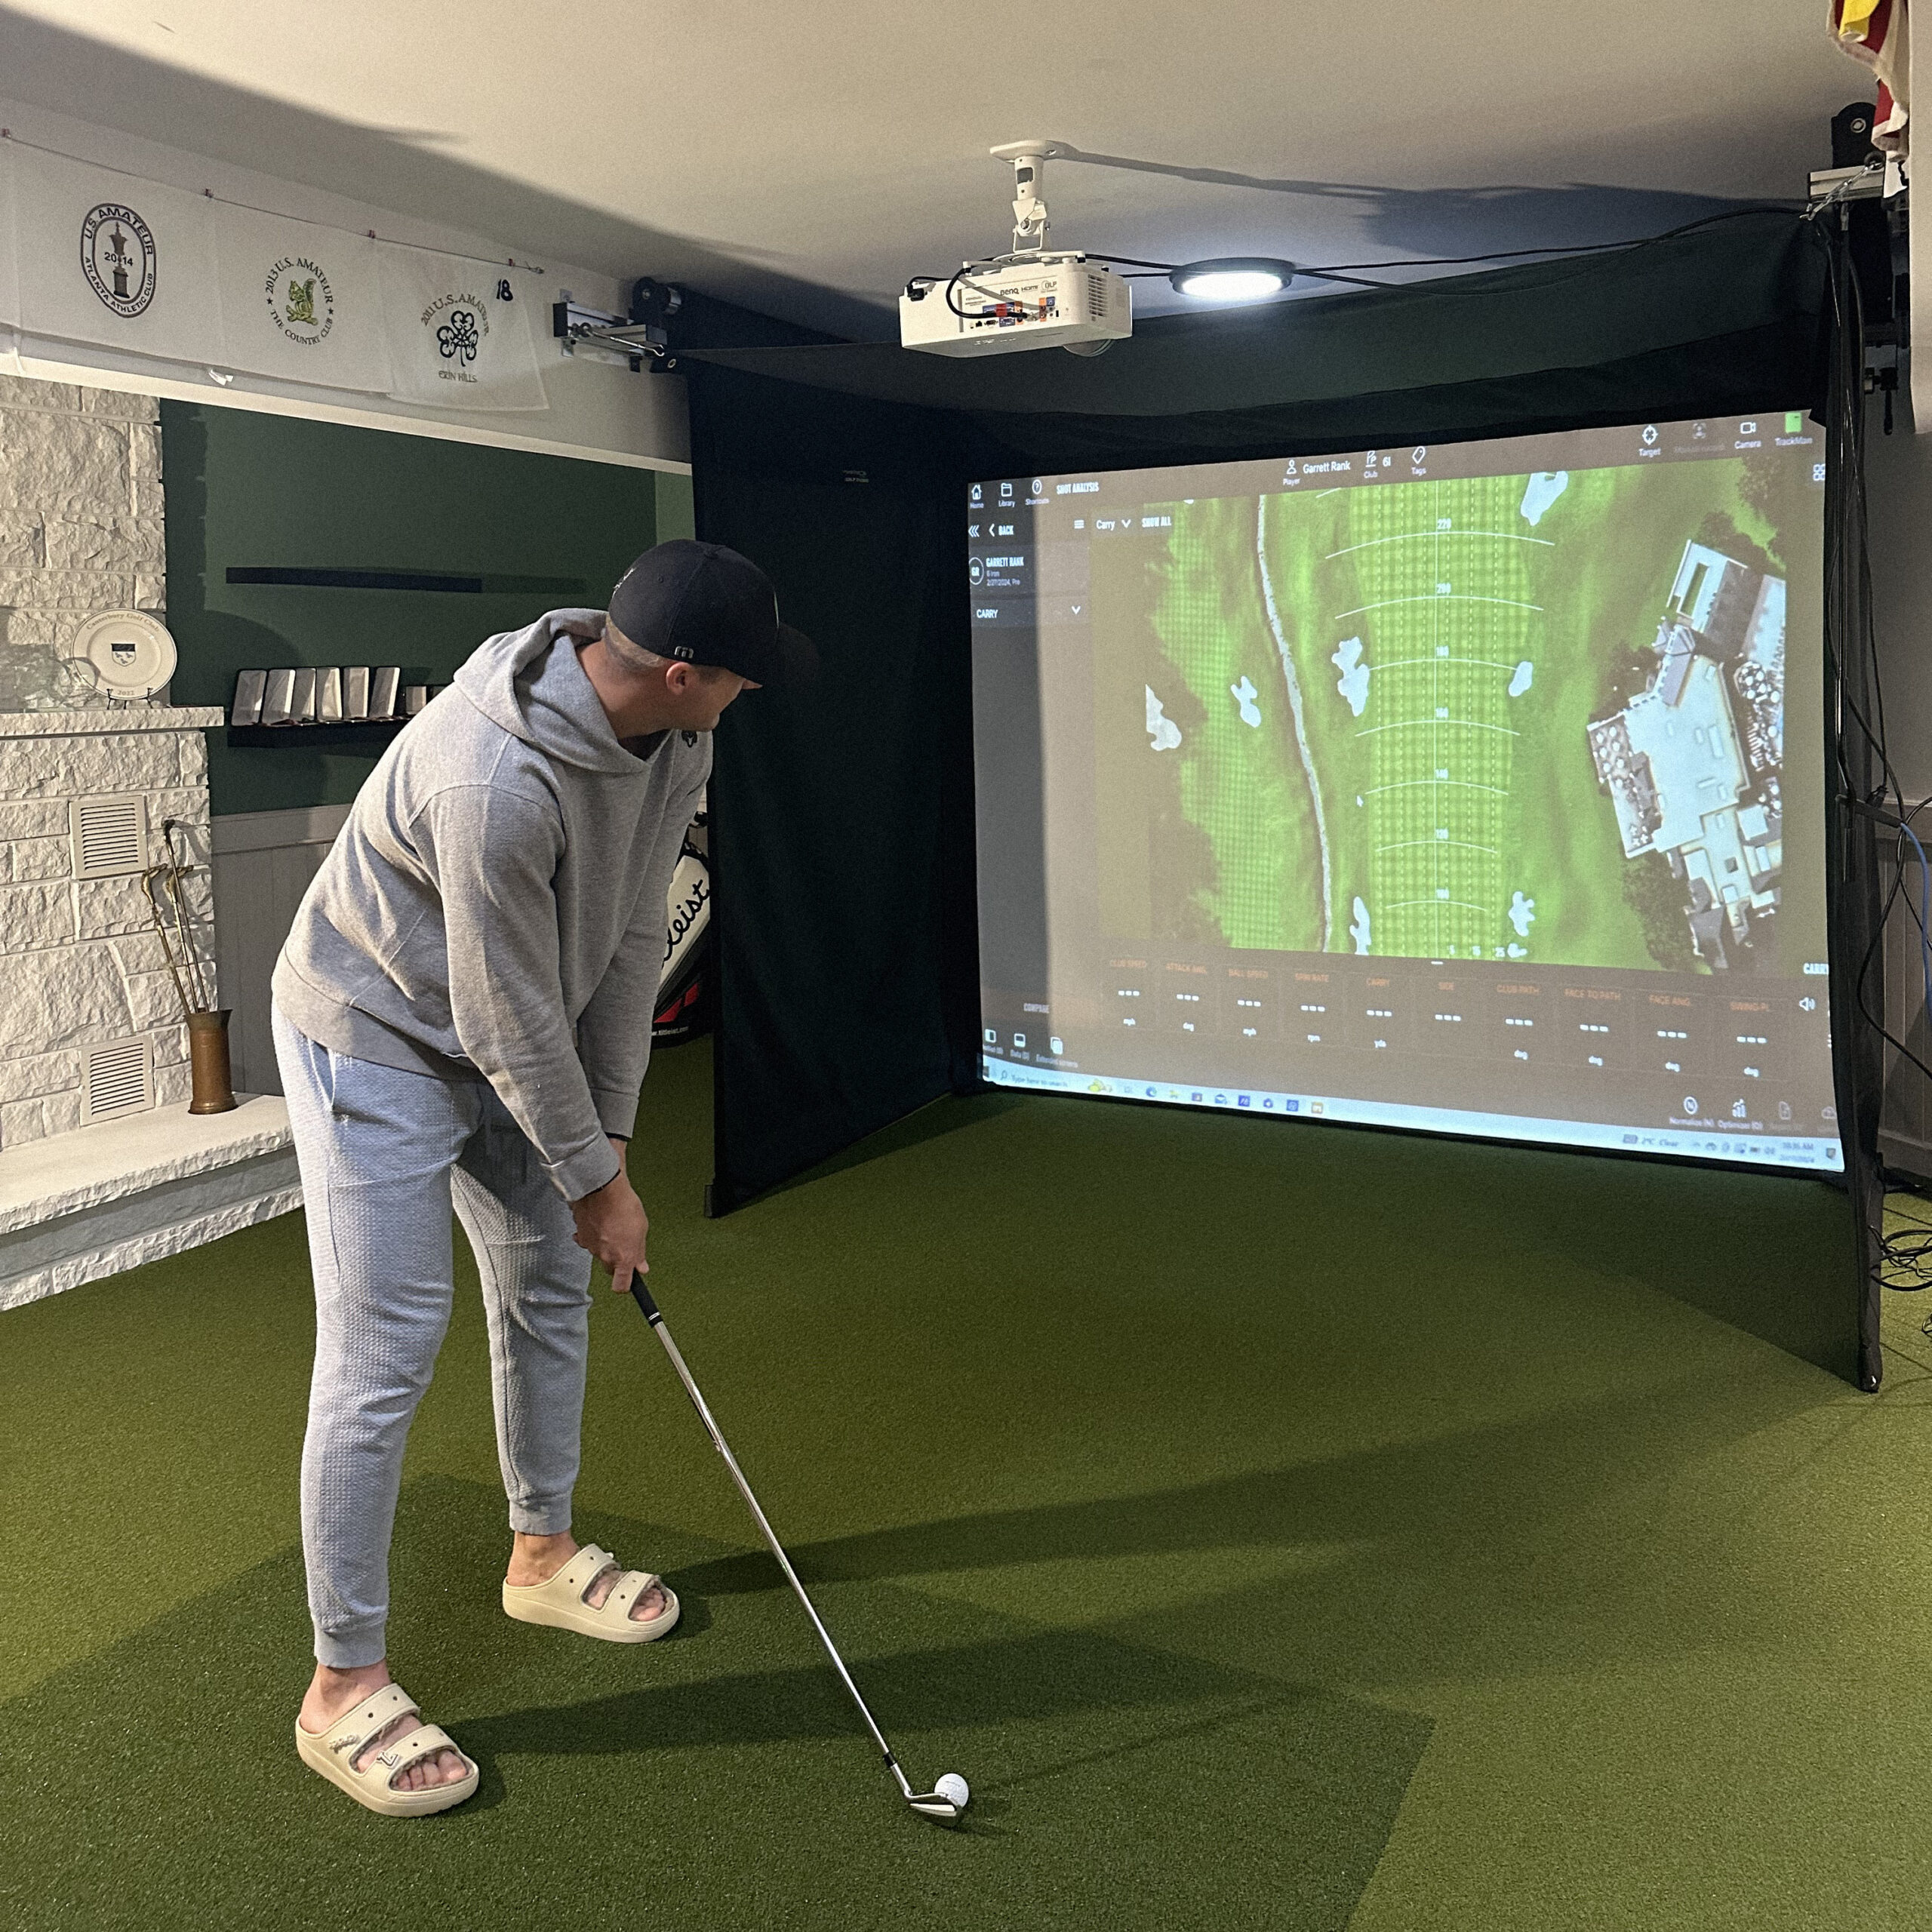
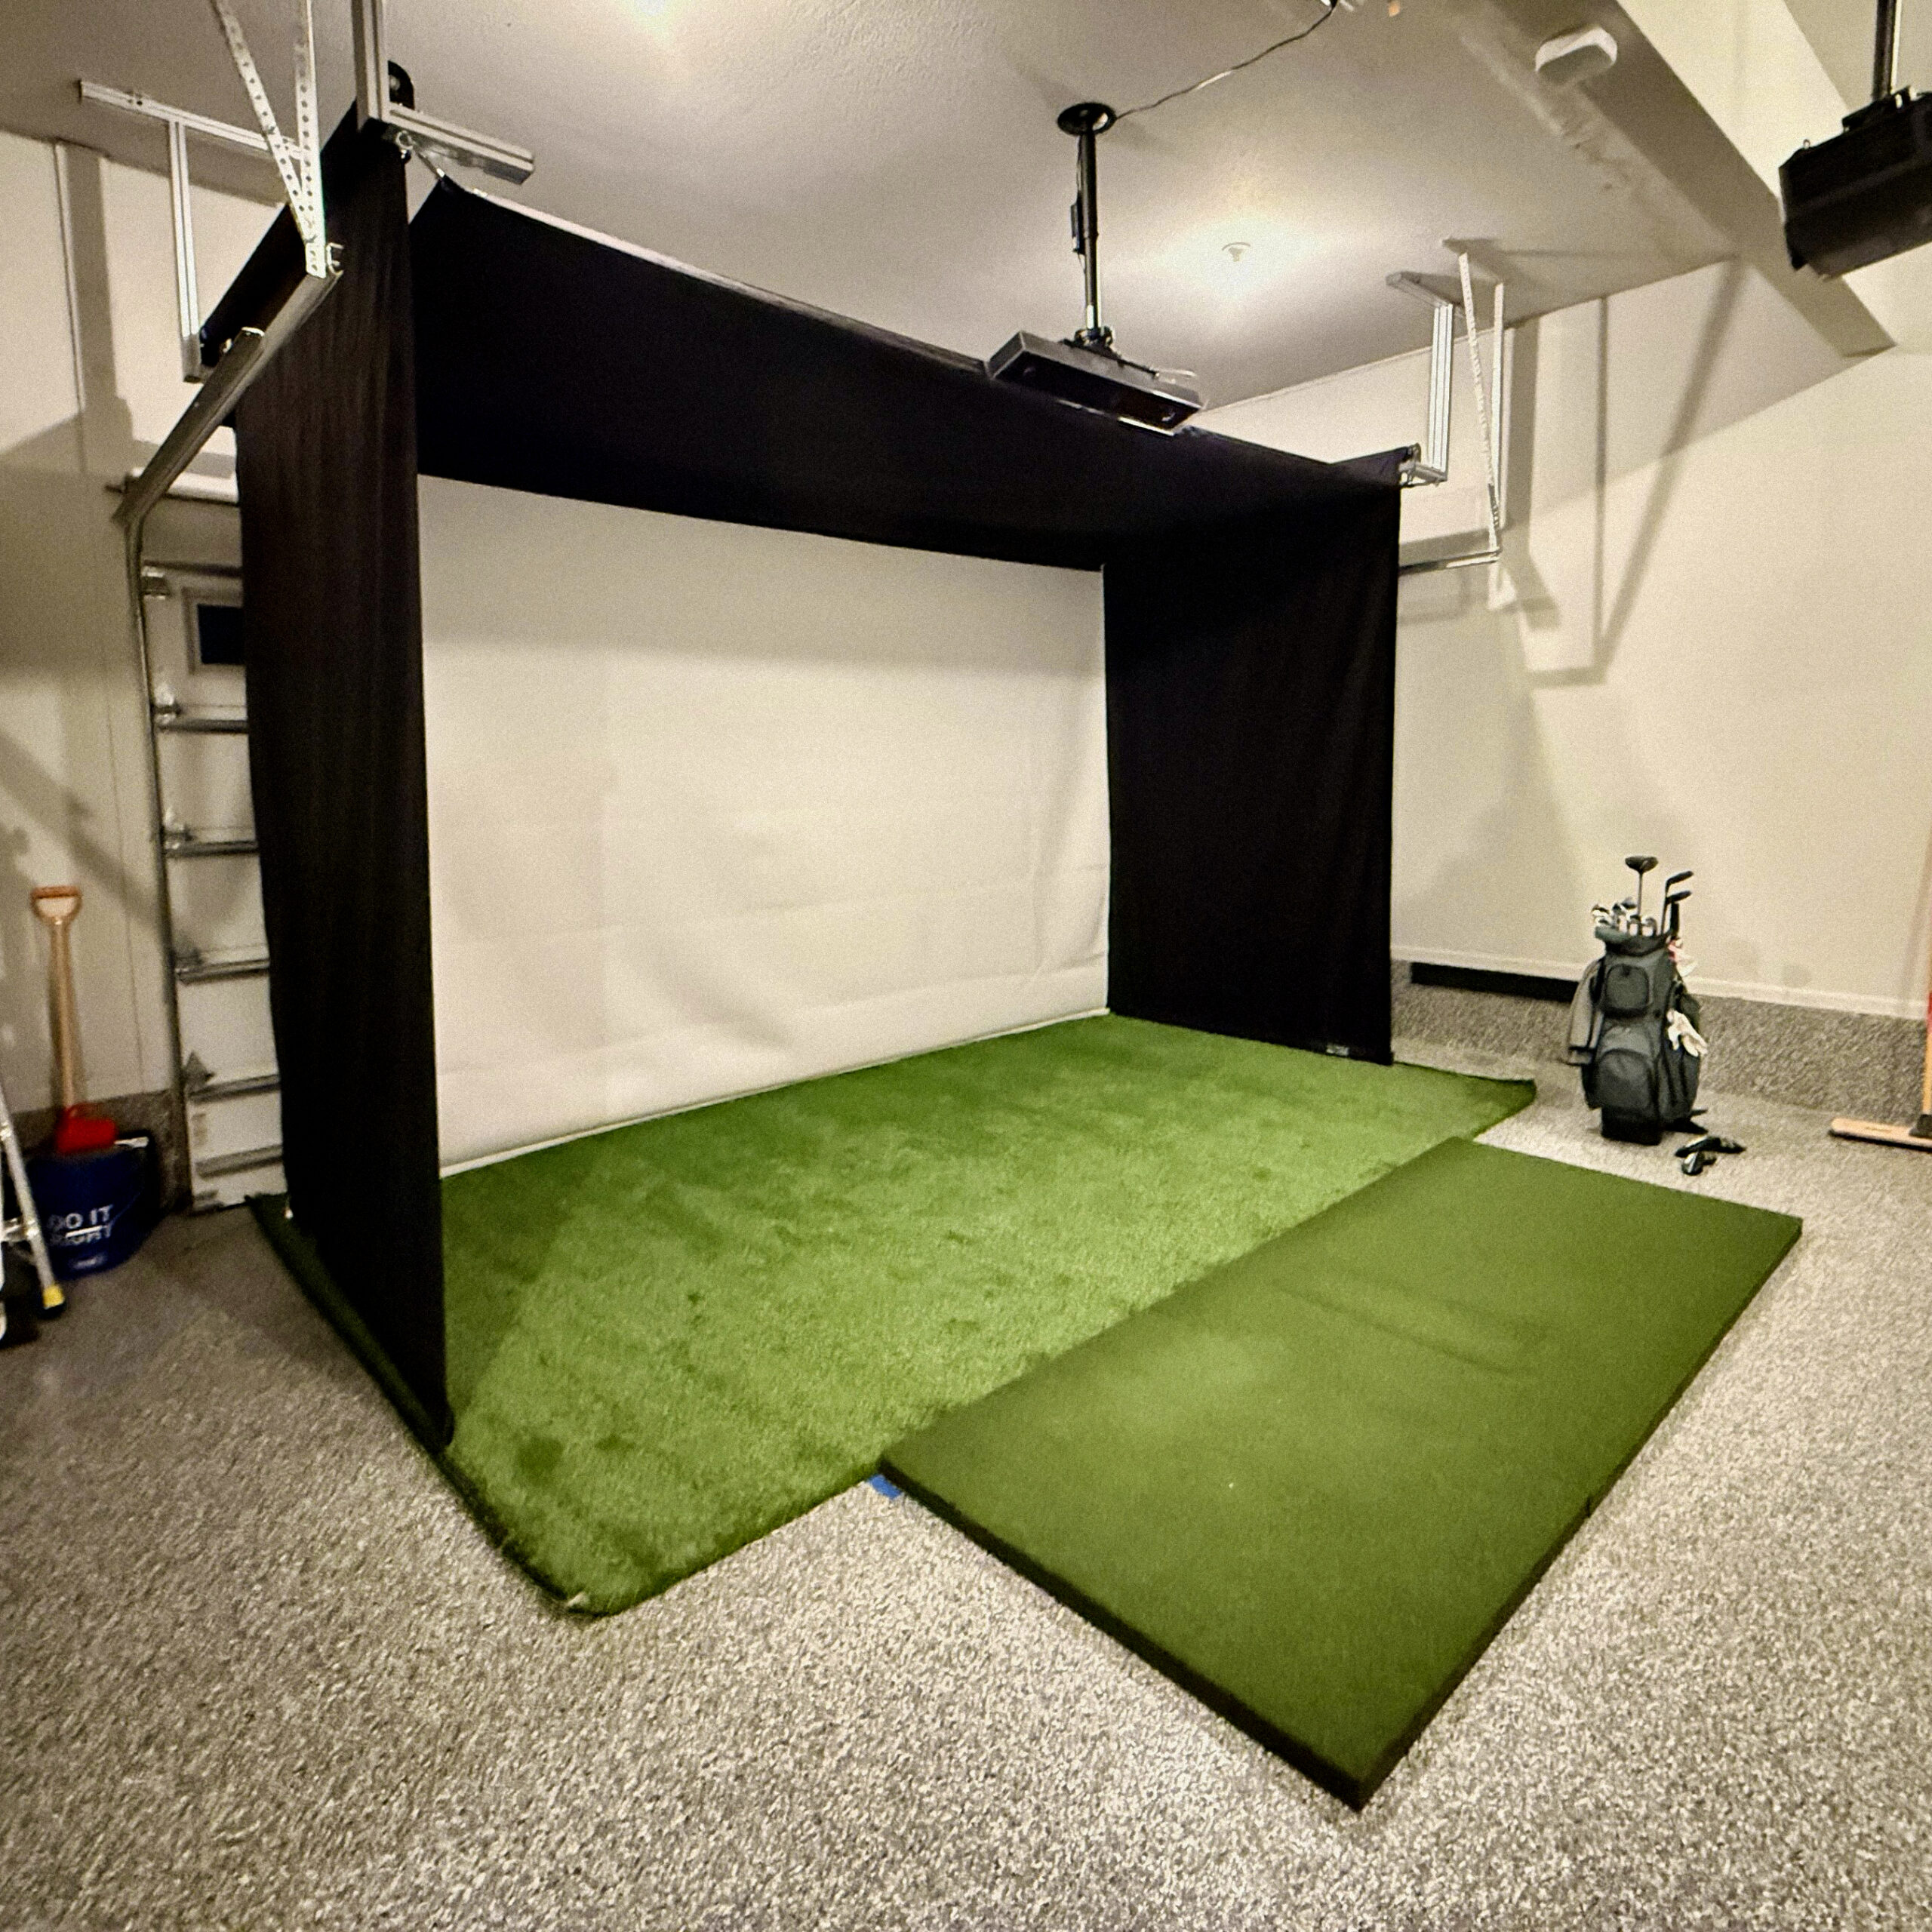
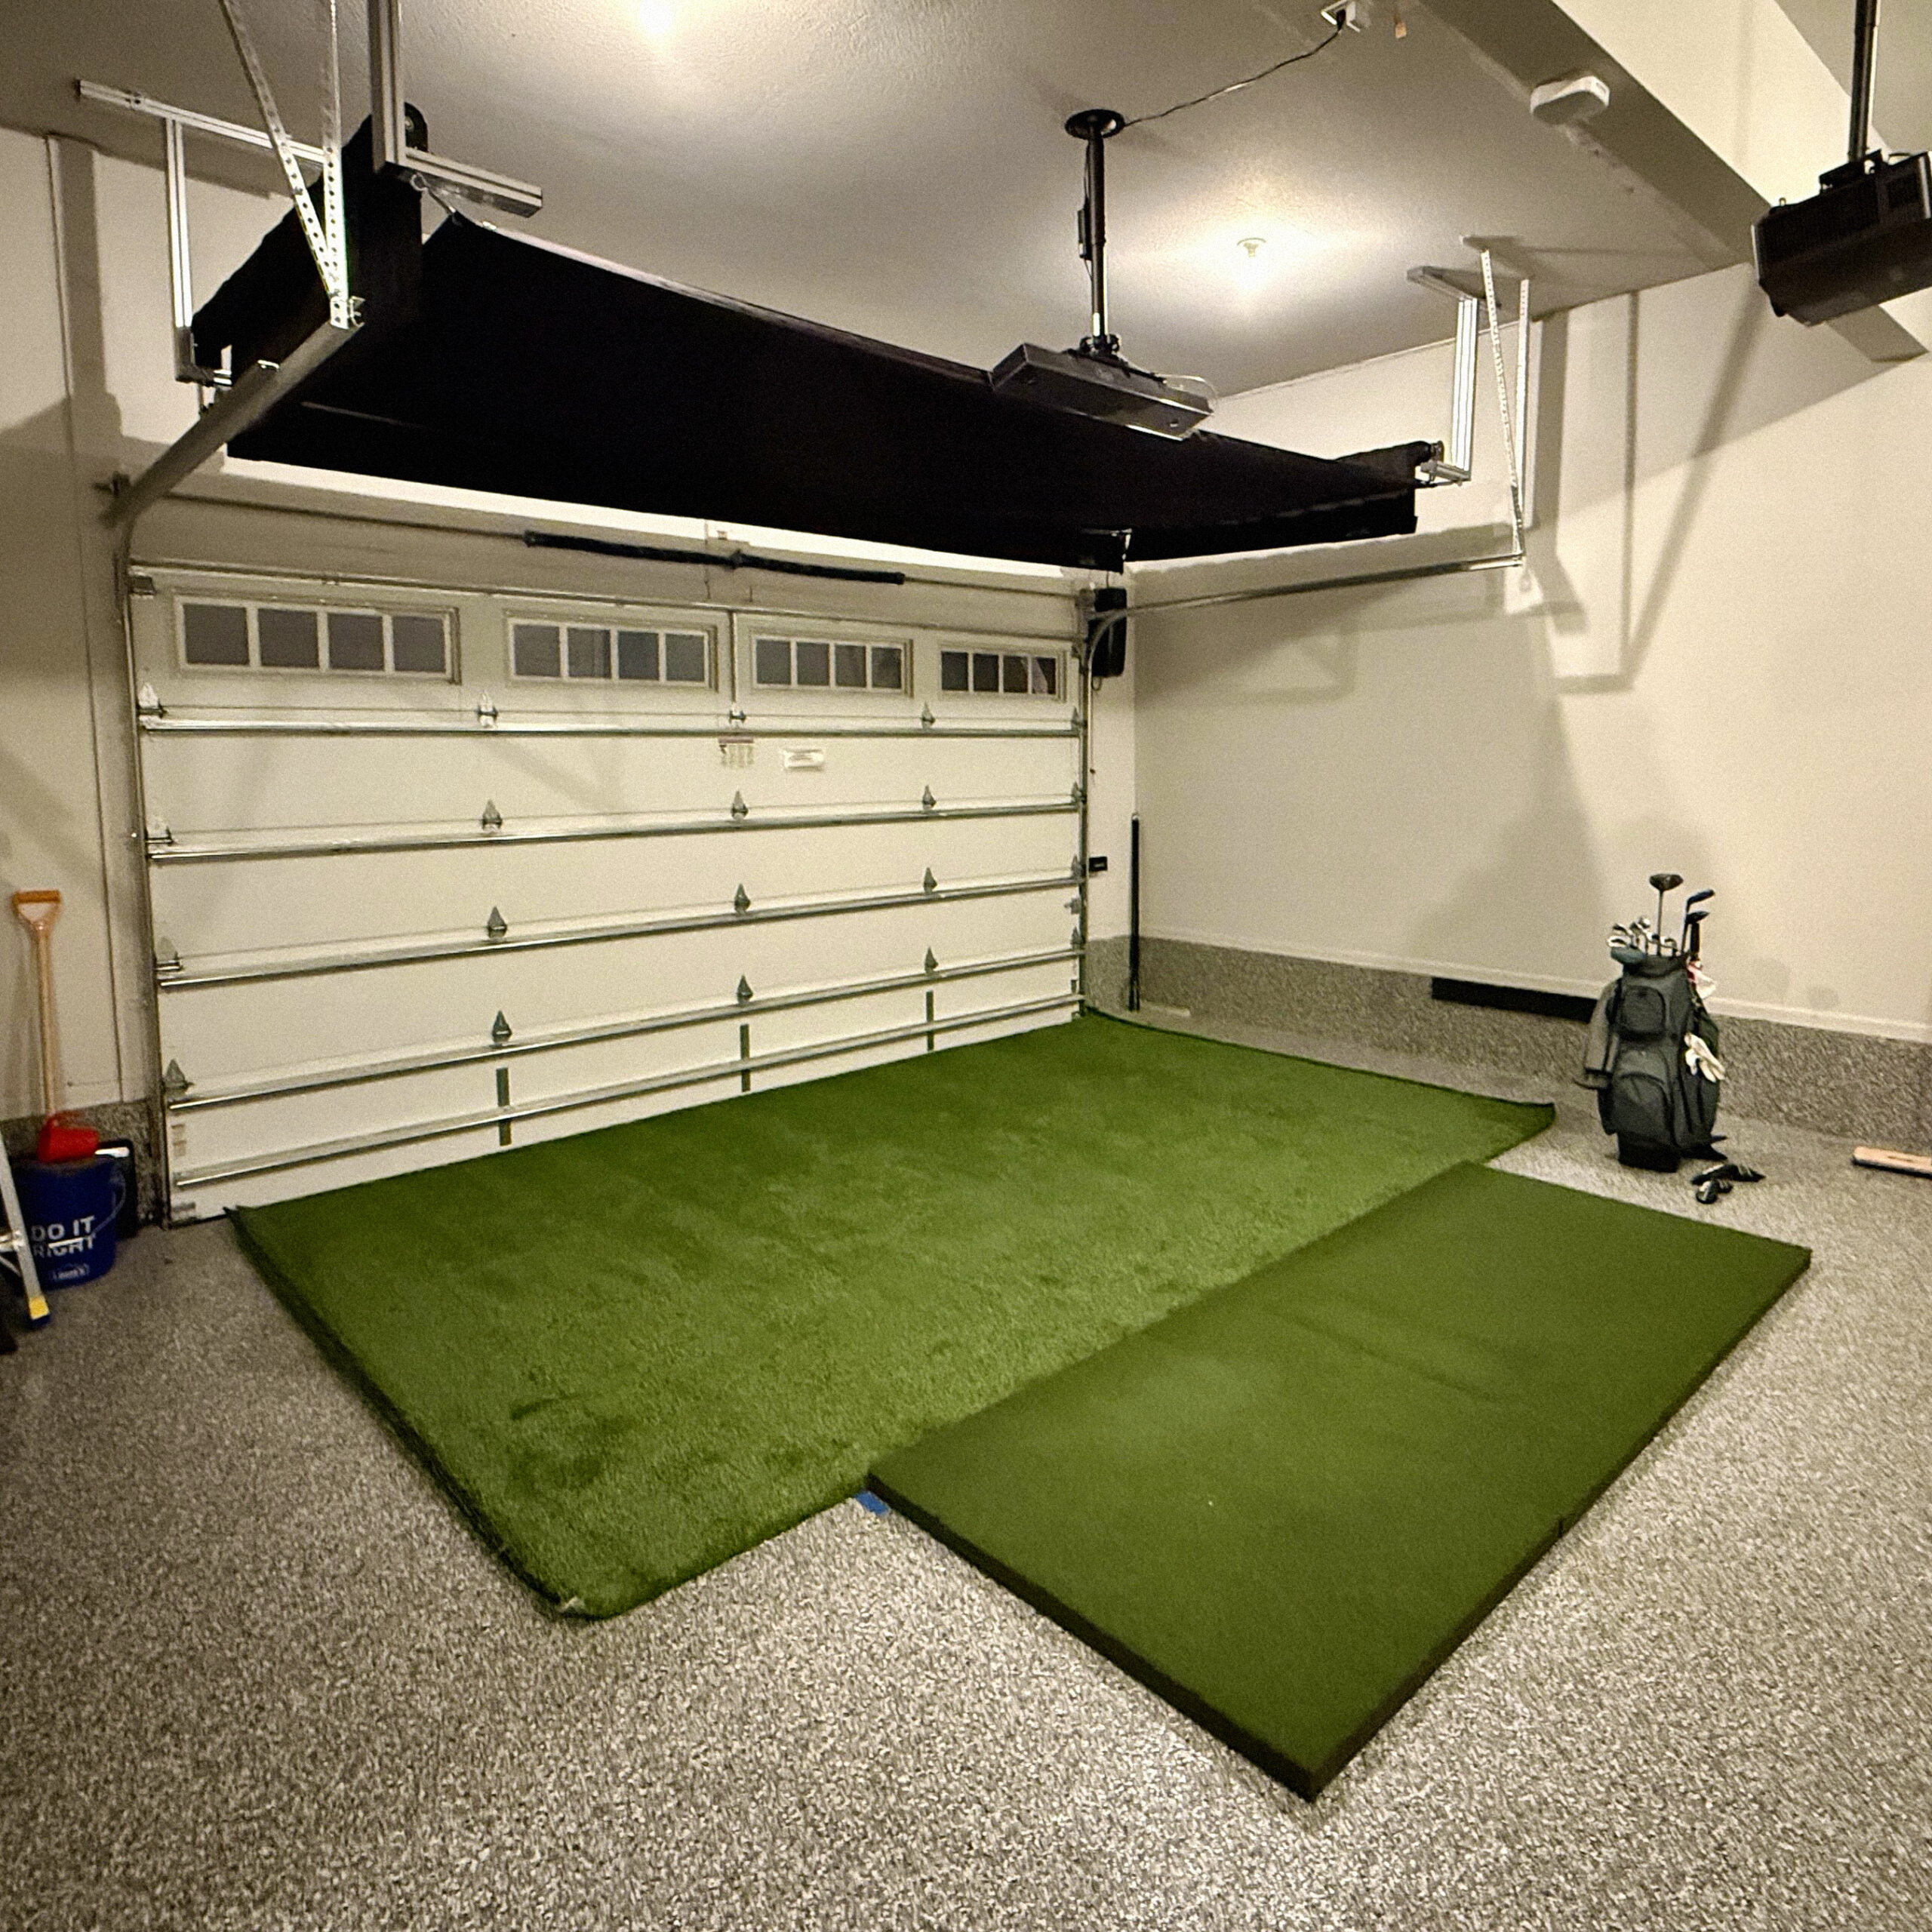
This is where the game has changed. The SportScreen Vanish Series is the world’s first retractable golf simulator enclosure — a complete impact screen, side containment and ceiling panel system that folds up into your ceiling in under 5 minutes.
When you want to play golf: lower the screen. When you’re done: retract it. Your garage goes back to being a garage. Car parked. Tools accessible. No compromise.
How It Works
The Vanish Series mounts to your garage ceiling using universal brackets. The entire enclosure — premium 3-ply impact screen, construction-grade mesh side screens, ceiling panel and baffles — rolls up into a compact housing at ceiling level. You choose between two control methods:
- Hand Crank — manual operation, no electrical connection needed. Turn the handle to deploy or retract.
- Remote Control — motorised one-touch operation. Press a button and the system does the rest. Requires a power outlet on each side.
Both options deploy and retract in under 5 minutes. When retracted, the enclosure sits flush against the ceiling — barely visible and completely out of the way.
Created by the team behind The SportScreen (known for their successful pitch on Dragons’ Den), the Vanish Series uses patented retractable technology that’s been engineered specifically for the demands of golf — high-velocity ball impacts, repeated full-power swings, and daily deployment cycles.
Choosing the Right Vanish Model for Your Garage
| Model | Width | Height | Screen Ratio | Projectable Height | Best For |
|---|---|---|---|---|---|
| Vanish 9 | Compact | Standard ceiling | — | — | Single garages, tight spaces |
| Vanish 11 | 3.1m | 2.5–2.6m | 4:3 | 2.31m (91″) | Standard double garages |
| Vanish 13H | 3.7m | 2.9–3.0m | 4:3 | 2.73m (107.5″) | Taller garages, outbuildings |
| Vanish 16 | 4.7m | 2.5–2.6m | 16:9 | 2.29m (90″) | Wide garages, widescreen |
| Vanish 16H | 4.7m | 2.9–3.0m | 16:9 | 2.59m (102″) | Large spaces, maximum immersion |
Our recommendation for most garages: The Vanish 11 is the best all-rounder. At 3.1m wide, it fits a standard double garage comfortably while leaving space for a car alongside when retracted. The 4:3 screen ratio works well with most projectors and simulation software.
If your garage has higher ceilings (2.9m+), consider the Vanish 13H — the taller projectable screen height makes a noticeable difference to the immersive experience.
Step-by-Step: Setting Up Your Garage Golf Simulator
Step 1: Measure Your Space
Before buying anything, measure three things:
- Ceiling height — from floor to the lowest point (watch for beams, lights and garage door mechanisms)
- Wall width — the back wall where your screen will mount
- Depth — from back wall to garage door
Write these down. They determine which enclosure model fits, where your projector goes, and whether you have room for a comfortable hitting position.
Step 2: Choose Your Enclosure
For a retractable setup, pick the Vanish model that matches your measurements. For a permanent setup, browse our impact screens and enclosures range.
Decide between Hand Crank and Remote Control. If you have accessible power outlets near the ceiling mount points, Remote Control is the more convenient option. If not, Hand Crank avoids the need for any electrical work.
Step 3: Select Your Launch Monitor
Your launch monitor is the brains of the operation. Budget options like the Garmin Approach R10 start from a few hundred pounds. Mid-range options like FlightScope Mevo+ or SkyTrak+ offer excellent accuracy. Premium options like Foresight GC3 or GCQuad deliver tour-level data.
For a garage setup, overhead-mounted monitors can be particularly practical as they stay out of the way and don’t take up floor space.
Step 4: Choose Your Projector
A short-throw or ultra-short-throw projector is ideal for garages where space is limited. Mount it to the ceiling, ideally just in front of or behind your hitting position. Key specs to look for: at least 3,000 lumens (garages can be bright), 1080p or 4K resolution, and low input lag for real-time ball flight.
Step 5: Set Up Your Hitting Area
Lay down a quality hitting mat at the correct distance from the screen (typically 2.5m–3m). Position your launch monitor according to its requirements — some sit behind the ball, others mount overhead. Connect your gaming PC to the projector and launch monitor, install your simulation software, and you’re ready to play.
Step 6: The Finishing Touches
Optional but recommended:
- LED lighting — ambient lighting makes a huge difference to the atmosphere and projection quality
- Putting turf — extend your practice area with a putting surface
- Speakers — course sounds and music enhance the experience
- Cable management — tidy cables and wiring keep the space clean, especially important if the garage is shared-use
Retractable vs Permanent Enclosure: Which Is Right for You?
| Factor | Retractable (Vanish Series) | Permanent Frame Enclosure |
|---|---|---|
| Garage still usable? | Yes — retracts in under 5 minutes | No — permanent structure |
| Car parking | Park alongside or underneath when retracted | Car lives on the driveway |
| Setup time per session | Under 5 minutes to deploy | Always ready — no setup needed |
| Installation | Ceiling-mounted brackets, 2-person job | Frame assembly, usually easier DIY |
| Price range | From £2,399 (sale) to £5,499 | From £300 to £2,000+ |
| Impact screen quality | Premium 3-ply with blackout layer included | Varies — budget to premium |
| Side containment | Full — sides, ceiling panel, baffles included | Varies — some include nets, some don’t |
| Warranty | 2-year manufacturer warranty | Varies by manufacturer |
| Best for | Shared-use garages, multi-purpose spaces | Dedicated golf rooms, outbuildings, cabins |
The honest answer: If your garage is dedicated to golf and nothing else, a permanent enclosure is simpler and cheaper. But if your garage needs to serve multiple purposes — parking, storage, workshop, family space — a retractable Vanish enclosure is the only solution that lets you have both without compromise.
Common Garage Golf Simulator Mistakes to Avoid
1. Not Checking Ceiling Obstructions
Garage door rails, light fixtures, beams and exposed pipework can all interfere with your enclosure or your swing. Check the full swing arc at your tallest club before committing to a setup.
2. Forgetting About the Projector Throw Distance
Your projector needs enough distance from the screen to fill it. A standard throw projector in a short garage won’t fill a large screen. Short-throw and ultra-short-throw models solve this — check our projector range for options suited to garages.
3. Underestimating Lighting
Garages are often bright with natural light from windows or under the door. This washes out your projected image. Blackout blinds on windows and a good LED lighting setup make a dramatic difference. The Vanish enclosure’s blackout-backed impact screen helps significantly here.
4. Skipping the Hitting Mat
Hitting off a bare garage floor destroys your clubs, your wrists and your floor. A proper strike mat is not optional — it protects everything and gives you realistic turf interaction.
5. Not Planning Cable Routing
A golf simulator needs power and data connections between the projector (ceiling), PC (usually near the hitting area), launch monitor and screen. Plan your cable routes before installation, especially with a retractable enclosure where cables need to accommodate the deploy/retract movement.
How Much Does a Garage Golf Simulator Cost?
Here’s a realistic budget breakdown for a garage golf simulator using a retractable enclosure:
| Component | Budget Option | Mid-Range | Premium |
|---|---|---|---|
| Retractable enclosure (Vanish) | From £2,399 (Vanish 9 HC) | £2,699 (Vanish 11 HC) | £4,299+ (Vanish 16 RC) |
| Launch monitor | £300–£500 (Garmin R10) | £1,500–£2,500 (Mevo+, SkyTrak) | £5,000+ (Foresight GC3/GCQuad) |
| Projector | £400–£700 | £800–£1,500 | £2,000+ |
| Gaming PC | £500–£800 | £1,000–£1,500 | £2,000+ |
| Hitting mat | £100–£200 | £200–£400 | £400+ |
| Total | £3,700–£4,600 | £6,200–£8,600 | £13,700+ |
For a more detailed breakdown, see our complete golf simulator cost guide.
Frequently Asked Questions
Can I fit a golf simulator in a single garage?
Yes, but space will be tight. A single garage is typically 2.4m–3m wide, which limits your enclosure options. The Vanish 9 is designed for this scenario. Ceiling height is usually the bigger concern — check you have at least 2.5m clearance.
Will a retractable screen affect my garage door?
No. The Vanish enclosure mounts to the ceiling at the back wall of your garage, well away from the garage door mechanism. When retracted, it sits flush against the ceiling and doesn’t interfere with the door rail or opening.
Can I leave my projector mounted when the enclosure is retracted?
Yes. Ceiling-mounted projectors stay in place permanently. Only the enclosure retracts — your projector, launch monitor mount and other ceiling fixtures remain where they are.
Do I need to insulate my garage for a golf simulator?
Not necessarily, but it helps with comfort during winter months. At minimum, consider draught-proofing around the garage door. A portable heater is usually sufficient for occasional use. If you plan to use the simulator daily through winter, basic wall and ceiling insulation is worth the investment.
What simulation software works best for a garage setup?
GSPro is the most popular choice — it’s affordable (subscription-based), has thousands of courses, and runs well on mid-range gaming PCs. E6 Connect and TGC 2019 are also excellent options. Your choice of software doesn’t affect the physical setup.
How loud is a golf simulator in a garage?
The main noise comes from ball impact on the screen. A quality 3-ply impact screen (like the one included with the Vanish Series) absorbs significantly more sound than budget screens. It’s comparable to hitting balls into a practice net — noticeable but not excessive. Acoustic wall panels can reduce noise further if needed.
Ready to Build Your Garage Golf Simulator?
The beauty of a retractable golf simulator enclosure is that you don’t have to make the garage-or-golf trade-off anymore. The SportScreen Vanish Series gives you a full golf simulator experience that disappears when you need your space back.
If you’re not sure which model or setup is right for your garage, get in touch. Send us your garage dimensions and we’ll recommend the right enclosure, projector and configuration for your space. Or call us on 0333 188 5877 — our team are golfers who use simulators daily, so you’ll get real advice from people who genuinely understand the setup.
Browse the full SportScreen Vanish Series range or explore our complete golf simulator collection to start planning your build.