Your basket is empty
Golf Simulator Acoustic Panels: Complete Soundproofing Guide
The thrill of perfecting your golf swing year-round shouldn’t come at the expense of household harmony or neighbourly relations. If you’ve invested in a home golf simulator, you’ve likely discovered that the crack of club meeting ball and the subsequent impact can create quite the acoustic disturbance. The good news? Proper acoustic treatment can transform your noisy simulator room into a peaceful practice sanctuary that keeps everyone happy.
This comprehensive guide will walk you through everything you need to know about golf simulator acoustic panels, from understanding the science behind sound absorption to selecting the right materials for your specific setup. Whether you’re converting a spare bedroom, basement, or purpose-built space, you’ll discover practical solutions that significantly reduce noise transmission whilst maintaining the authentic feel of your indoor golf experience. We’ll explore different panel types, installation methods, and additional soundproofing strategies that work together to create an acoustically optimised golf simulator room.
Understanding Golf Simulator Noise Issues
Golf simulators generate multiple types of noise that can travel throughout your home and beyond. The primary culprits include the sharp crack of impact, vibrations transmitted through floors and walls, and the continuous hum of projection equipment and ventilation systems.
Types of Noise Generated
Impact noise represents the most significant challenge in golf simulator soundproofing. When your club strikes the ball, it creates a sudden, high-frequency sound that can penetrate walls and disturb adjacent rooms. The ball’s impact against the screen or enclosure adds another layer of acoustic disturbance, often accompanied by vibrations that travel through the structure itself.
Airborne noise includes the ambient sounds from your simulator’s electronic components, including projectors, computers, and sound systems. Whilst individually these may seem minor, collectively they contribute to an overall noise footprint that can be particularly noticeable during evening practice sessions.
Structural vibrations occur when impact forces travel through your flooring system into the building’s framework. These low-frequency vibrations can be felt and heard in rooms below and adjacent to your simulator space, making them particularly problematic in multi-storey homes.
Impact on Household Dynamics
Uncontrolled simulator noise can strain relationships with family members and neighbours. The repetitive nature of practice sessions, combined with the sharp acoustic signature of golf impacts, creates a uniquely intrusive sound profile that standard household noise doesn’t typically match.
In terraced houses or flats, noise transmission becomes even more critical. What might seem like reasonable practice volume to you could register as significant disturbance to those sharing walls or floors. Understanding these dynamics helps justify the investment in proper acoustic treatment from both a courtesy and property value perspective.
The Science Behind Golf Simulator Acoustic Panels
Effective acoustic treatment relies on understanding how sound waves behave in enclosed spaces and how different materials interact with various frequencies. Golf simulator acoustic panels work through absorption, diffusion, and reflection control to manage the complex acoustic environment these systems create.
Sound Absorption Principles
Acoustic panels reduce noise through sound absorption, converting sound energy into minimal amounts of heat energy within the panel material. The effectiveness of this process depends on the panel’s density, thickness, and internal structure. Open-cell foam materials excel at absorbing mid to high frequencies, whilst denser materials like mineral wool handle lower frequencies more effectively.
The Noise Reduction Coefficient (NRC) measures a material’s sound absorption capability across standard frequency ranges. Golf simulator applications typically require materials with NRC ratings of 0.85 or higher to achieve meaningful noise reduction. Higher-quality panels often achieve NRC ratings approaching 1.0, representing nearly complete absorption of incident sound energy.
Frequency-Specific Considerations
Golf impacts generate sound energy across a broad frequency spectrum, with particular concentration in the 1000-4000 Hz range where human hearing is most sensitive. Effective acoustic treatment must address this frequency range whilst also managing lower frequencies that contribute to structural vibration transmission.
Panel thickness directly correlates with low-frequency absorption capability. Thin panels (25-50mm) handle high frequencies effectively but struggle with frequencies below 500 Hz. Thicker panels (75-100mm) provide more balanced absorption across the frequency spectrum, making them preferable for golf simulator applications.

Types of Acoustic Panels for Golf Simulators
Selecting appropriate acoustic panels requires understanding the various options available and their specific performance characteristics. Different panel types excel in different applications, and many successful installations combine multiple panel types for optimal results.
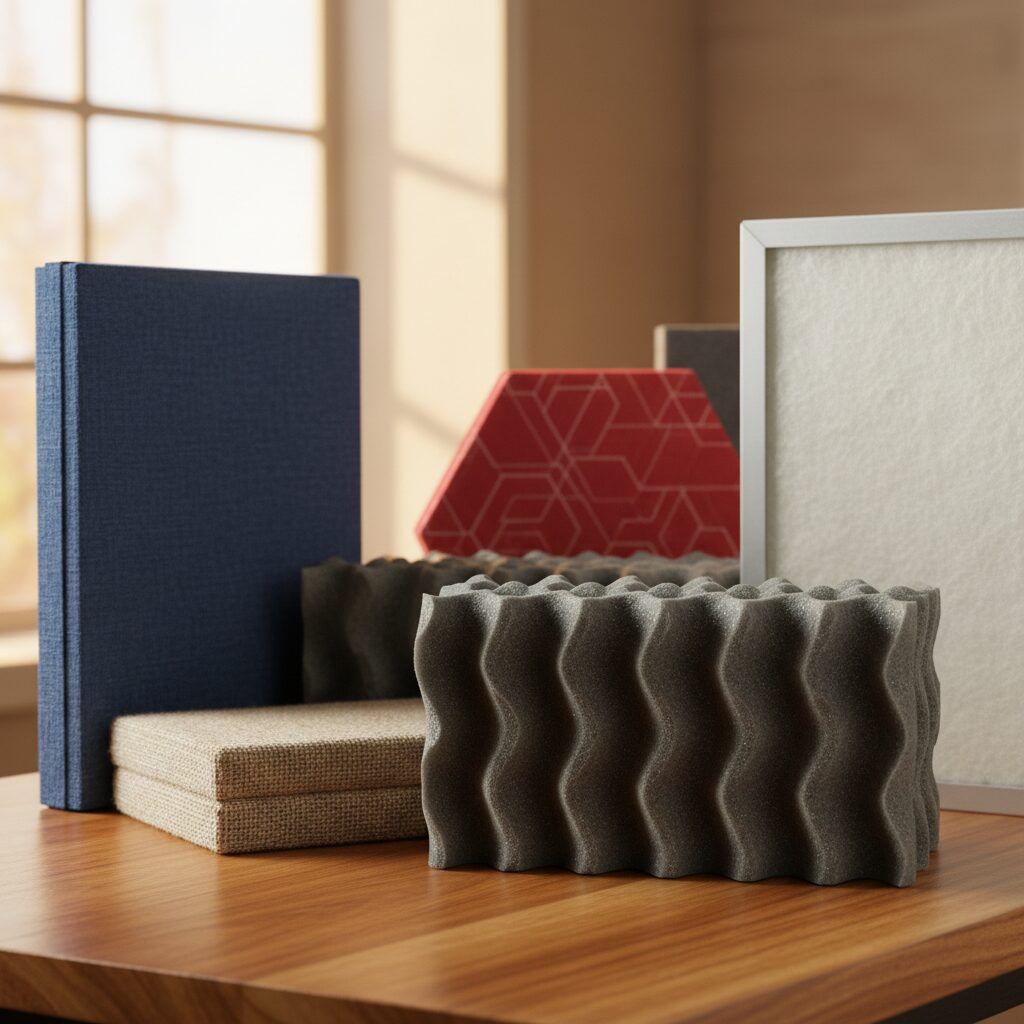
Foam Acoustic Panels
Polyurethane foam panels represent the most common entry-level acoustic treatment option. These lightweight panels offer good high-frequency absorption and easy installation, making them popular for budget-conscious installations.
However, standard foam panels have limitations in golf simulator applications. Their relatively poor low-frequency performance means they address only part of the acoustic challenge. Additionally, their open-cell structure can collect dust and odours over time, potentially requiring replacement in heavily-used simulator rooms.
High-density foam panels offer improved performance across a broader frequency range whilst maintaining the easy installation characteristics of standard foam. These panels typically cost more but provide better long-term value through improved durability and acoustic performance.
Mineral Wool Panels
Mineral wool acoustic panels provide superior performance for golf simulator applications. These panels combine excellent acoustic absorption with fire resistance and dimensional stability. The dense, fibrous structure effectively absorbs sound energy across a broad frequency spectrum.
Rockwool and glasswool represent the two primary mineral wool types used in acoustic panels. Both offer excellent acoustic performance, with rockwool providing slightly better low-frequency absorption due to its higher density. Glasswool panels often cost less whilst still delivering effective noise reduction.
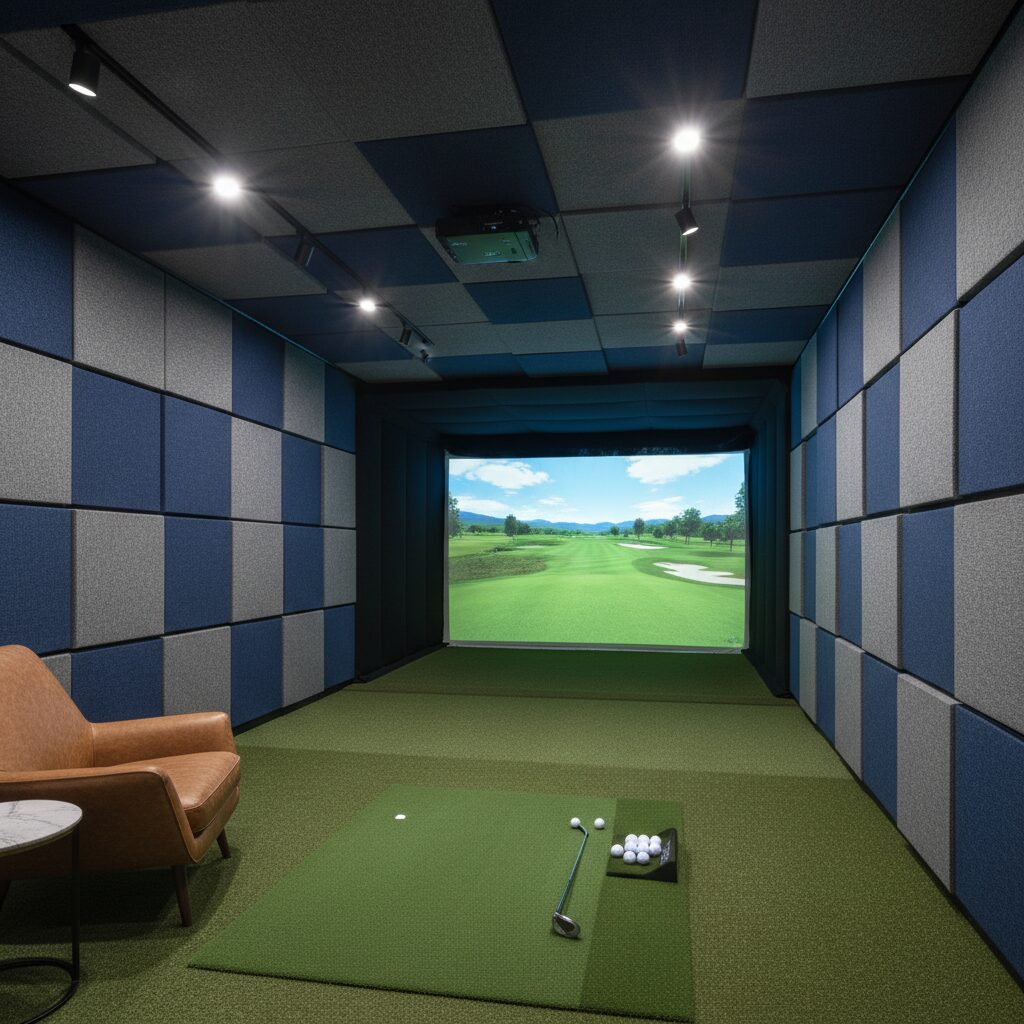
Fabric-wrapped mineral wool panels offer the best combination of performance and aesthetics for most golf simulator installations. The fabric covering protects the mineral wool core whilst allowing sound penetration, and a wide range of fabric options enables integration with existing décor schemes.
Composite Acoustic Panels
Composite panels combine multiple materials to optimise acoustic performance across different frequency ranges. A typical composite panel might feature a mineral wool core with foam layers and a fabric covering, creating a single product that addresses the full spectrum of golf simulator noise.
These panels typically cost more than single-material options but offer superior performance and convenience. The engineering required to optimise material combinations results in panels with very high NRC ratings and balanced frequency response characteristics.
Specialised Golf Simulator Panels
Some manufacturers produce acoustic panels specifically designed for golf simulator applications. These panels often incorporate impact-resistant facings and enhanced low-frequency absorption to address the unique challenges of golf simulator noise.
Whilst more expensive than general-purpose panels, specialised golf simulator panels can provide better overall results with fewer panels required. The reduced panel count can offset some of the cost premium whilst simplifying installation and maintaining a cleaner aesthetic.
Planning Your Acoustic Treatment Installation
Successful acoustic treatment requires careful planning that considers room dimensions, simulator placement, and acoustic goals. Proper planning ensures optimal panel placement and helps determine the appropriate quantity and type of panels needed.
Room Assessment and Measurement
Begin by measuring your simulator room and identifying primary noise transmission paths. Hard surfaces like concrete walls, tiled floors, and exposed ceilings contribute to noise reflection and require acoustic treatment priority. Windows and doors represent particular challenges as they typically offer less sound isolation than solid walls.
Consider the room’s intended use beyond golf simulation. Multi-purpose rooms may require acoustic treatment that can be easily reconfigured or temporarily removed. Dedicated simulator rooms allow for permanent installation of optimised acoustic treatments.
Document existing noise levels using a smartphone sound meter app or dedicated sound level meter. These baseline measurements help establish treatment goals and provide objective data for measuring improvement after panel installation.
Coverage Calculations
Effective acoustic treatment typically requires covering 25-40% of wall and ceiling surface area, with higher percentages needed for rooms with particularly hard surfaces or challenging acoustic environments. Golf simulators often benefit from coverage towards the upper end of this range due to their high sound energy output.
Prioritise wall areas directly behind and to the sides of your hitting area, as these surfaces receive the most direct sound energy. Ceiling treatment becomes particularly important in rooms with hard flooring materials like concrete or tile.
Budget Planning Considerations
Quality acoustic panels represent a significant investment, but proper planning helps maximise results within budget constraints. Consider implementing treatment in phases, beginning with the highest-priority areas and expanding coverage over time as budget allows.
Factor installation costs into your budget planning. Professional installation ensures optimal results but adds to project costs. DIY installation can reduce expenses but requires time and basic construction skills.
Installation Methods and Best Practices
Proper installation maximises acoustic panel performance whilst ensuring long-term durability and safety. Different installation methods suit different panel types and room configurations, and following manufacturer guidelines prevents common installation mistakes that can compromise results.
Direct Mounting Systems
Direct mounting involves securing panels directly to wall or ceiling surfaces using mechanical fasteners. This method works well for lightweight foam panels and provides a clean, permanent installation.
Use appropriate fasteners for your wall type – hollow wall anchors for plasterboard, masonry screws for concrete or brick walls. Distribute fastening points evenly across the panel to prevent sagging or distortion over time.
Some panels include mounting hardware or built-in mounting systems. These typically provide easier installation whilst ensuring proper panel support. Follow manufacturer spacing recommendations to maintain panel flatness and acoustic performance.
Suspended Installation Systems
Suspended systems support panels using ceiling-mounted frames or cable systems. This approach works particularly well for ceiling installations and allows easy panel removal for maintenance or reconfiguration.
Grid systems similar to suspended ceiling frameworks provide excellent panel support whilst maintaining easy access. These systems accommodate different panel sizes and allow mixed panel types within a single installation.
Cable suspension systems offer a more minimalist appearance but require careful load calculations and proper anchoring points. These systems work best with lightweight panels and may not suit heavy mineral wool panels.
Adhesive Installation
Adhesive mounting offers the quickest installation method but requires compatible surfaces and appropriate adhesive selection. This method works well for smooth, clean surfaces but may not provide adequate holding power for textured or painted surfaces.
Construction adhesive provides strong, permanent bonding but makes panel removal difficult. Spray adhesives offer easier application but may not provide adequate long-term hold for heavier panels.
Always test adhesive compatibility with both panel and wall materials in an inconspicuous area before proceeding with full installation. Some foam panels can be damaged by solvent-based adhesives.
Professional Installation Considerations
Professional installation ensures optimal results, particularly for complex rooms or high-performance panel systems. Professional installers have experience with different panel types and can recommend optimal placement strategies.
Professional installation becomes particularly valuable when integrating acoustic treatment with other room modifications like electrical work or HVAC installations. Coordinating these trades prevents installation conflicts and ensures all systems work together effectively.
Consider professional installation for ceiling work, which requires specialised equipment and safety considerations. Professional installers carry appropriate insurance and follow safety protocols that may be challenging for DIY installations.
Comprehensive Acoustic Treatment Solutions
Effective golf simulator soundproofing extends beyond acoustic panels to include floor treatments, door seals, and other noise control measures. Combining multiple approaches creates comprehensive acoustic treatment that addresses all noise transmission paths.
Floor Treatments and Vibration Control
Floor treatments control impact vibration transmission that panels alone cannot address. Rubber mats designed for golf simulators provide excellent impact absorption whilst maintaining stable footing for your golf swing.
Layered flooring systems combining rubber underlayment with carpet or synthetic turf provide both vibration control and appropriate playing surfaces. These systems significantly reduce transmitted vibrations whilst creating appropriate golf simulator aesthetics.
Consider the ceiling structure below your simulator room when selecting floor treatments. Concrete floors require less vibration control than timber-framed floors, which can transmit vibrations more readily to spaces below.
Door and Window Treatments
Doors and windows represent weak points in room acoustic isolation and require special attention. Solid-core doors provide better sound isolation than hollow-core doors, and door sweeps eliminate gaps that allow sound transmission.
Weather stripping around door frames creates acoustic seals that prevent sound leakage. Use automotive-grade weather stripping for durability and effective sealing. Check and replace weather stripping periodically as it can compress and lose effectiveness over time.
Window treatments for golf simulators must balance acoustic performance with any natural light requirements. Heavy curtains or blinds provide some acoustic benefit, whilst maintaining window functionality for rooms requiring natural light.
Integration with Existing Room Features
Successful acoustic treatment integrates with existing room features rather than competing with them. Plan panel placement around existing fixtures, switches, and outlets to maintain functionality whilst achieving acoustic goals.
Ventilation systems require special consideration in acoustically treated rooms. Acoustic panels can affect air circulation patterns, potentially requiring adjustments to maintain comfortable room conditions during extended practice sessions.
Lighting integration becomes important when installing ceiling panels or wall-mounted treatments. Plan acoustic treatment placement to maintain adequate illumination for golf simulation whilst avoiding shadows or glare issues.
| Panel Type | NRC Rating | Price Range (per m²) | Best For | Installation Difficulty |
|---|---|---|---|---|
| Basic Foam Panels | 0.65-0.80 | £15-£30 | Budget installations, high frequencies | Easy |
| High-Density Foam | 0.80-0.90 | £25-£45 | DIY installations, moderate performance | Easy |
| Mineral Wool Panels | 0.85-0.95 | £35-£60 | Professional results, broad frequency range | Moderate |
| Fabric-Wrapped Panels | 0.85-1.00 | £45-£80 | Aesthetic appeal, professional finish | Moderate |
| Composite Panels | 0.90-1.00 | £55-£90 | Maximum performance, premium installations | Moderate-Difficult |
| Golf-Specific Panels | 0.90-1.00 | £65-£120 | Dedicated simulators, impact resistance | Moderate-Difficult |
Measuring and Optimising Acoustic Performance
Quantifying acoustic treatment effectiveness helps validate your investment and identify areas for improvement. Simple measurement techniques provide objective data about noise reduction performance and guide future acoustic modifications.
Before and After Measurements
Document baseline noise levels before installing acoustic treatment using consistent measurement methods and locations. Take readings during typical simulator use to capture realistic noise levels that acoustic treatment must address.
Repeat measurements after panel installation using identical methods and locations. Meaningful noise reduction typically ranges from 5-15 decibels, depending on coverage percentage and panel quality. Remember that decibel measurements use logarithmic scaling, so seemingly small numerical improvements represent significant actual noise reduction.
Consider measurements at different times and with various simulator activities. Driver shots create different acoustic challenges than putting practice, and comprehensive measurement captures the full range of acoustic conditions your treatment must handle.
Fine-Tuning Panel Placement
Initial panel installations may reveal acoustic issues requiring additional treatment or repositioning. Common problems include flutter echoes between parallel surfaces or persistent noise transmission through untreated areas.
Temporary panels allow experimentation with different placement strategies before committing to permanent installation. Large cardboard boxes or moving blankets can simulate panel placement for testing purposes.
Consider acoustic software apps that provide real-time frequency analysis. These tools help identify specific frequency ranges requiring additional treatment and guide panel selection for optimal performance.
Long-Term Maintenance Considerations
Acoustic panels require periodic maintenance to preserve their effectiveness and appearance. Dust accumulation can reduce panel performance and create hygiene issues in frequently used simulator rooms.
Vacuum fabric-covered panels regularly using upholstery attachments to remove surface dust without damaging panel materials. Foam panels may require replacement every few years in heavily used installations as they can compress and lose effectiveness over time.
Monitor panel mounting systems periodically to ensure secure attachment. Vibrations from simulator use can gradually loosen fasteners, potentially creating safety hazards or reducing acoustic performance.
Frequently Asked Questions
How many acoustic panels do I need for my golf simulator room?
The number of panels required depends on room size, existing surfaces, and acoustic goals. Generally, plan to cover 25-40% of wall and ceiling surface area for effective noise reduction. A typical 3m × 4m simulator room requires 15-25 panels of standard size (60cm × 60cm), with additional panels needed for rooms with particularly hard surfaces. Consider starting with panels for the primary impact areas behind and beside your hitting position, then expand coverage based on results.
Can I install acoustic panels myself, or do I need professional help?
Most acoustic panel installations are suitable for DIY completion with basic tools and construction knowledge. Lightweight foam panels offer the easiest installation, whilst mineral wool panels may require more careful handling and proper safety equipment. Professional installation becomes valuable for ceiling work, complex room configurations, or when coordinating with other trades. Consider professional consultation for panel selection and layout planning even if you complete the installation yourself.
What’s the difference between acoustic panels and soundproofing?
Acoustic panels primarily absorb sound within a room, reducing echoes and reverberation, whilst soundproofing prevents sound transmission between spaces. Golf simulator applications typically require both approaches – panels to control noise within the simulator room and soundproofing measures like door seals and floor treatments to prevent noise transmission to other areas. Panels alone won’t completely eliminate noise transmission but significantly reduce it when combined with other soundproofing measures.
How effective are acoustic panels at reducing golf simulator noise?
Quality acoustic panels can reduce golf simulator noise by 5-15 decibels when properly installed with adequate coverage. This represents a significant reduction in perceived noise levels, as human hearing interprets a 10-decibel reduction as roughly half the perceived loudness. The actual reduction depends on panel type, coverage percentage, room characteristics, and integration with other noise control measures like floor treatments and door seals.
Do acoustic panels affect the room’s temperature or ventilation?
Acoustic panels have minimal impact on room temperature but can affect air circulation patterns, particularly with extensive coverage. Most panels provide slight insulation value that can make rooms marginally warmer. Ensure adequate ventilation for extended practice sessions, particularly in smaller rooms with significant panel coverage. Consider ventilation patterns when planning panel placement to avoid blocking air circulation routes.
Are there acoustic panels specifically designed for golf simulators?
Several manufacturers produce acoustic panels optimised for golf simulator applications. These specialised panels often feature enhanced impact resistance, improved low-frequency absorption, and mounting systems designed for golf simulator environments. Whilst more expensive than general-purpose panels, they can provide better results with fewer panels required. Standard high-quality acoustic panels also work effectively when properly selected and installed with adequate coverage.
Exploring golf simulator bundles that include acoustic considerations can help ensure your complete setup addresses both performance and noise control requirements. When planning your installation, consider how acoustic treatments integrate with other simulator components like impact screens and wall panels. Many successful installations combine acoustic panels with purpose-built cabin golf dens or panel golf dens that incorporate noise control into their fundamental design.
Proper acoustic treatment transforms your golf simulator from a potential source of household discord into an enjoyable practice facility that enhances rather than detracts from your home environment. The investment in quality acoustic panels pays dividends through improved relationships with family and neighbours, whilst creating a more pleasant practice environment that encourages regular use of your simulator investment. By understanding the science behind acoustic treatment and following proper installation practices, you can achieve professional-level noise control that makes year-round golf practice a harmony-preserving pleasure.