Your basket is empty
Golf Simulator Room Setup: Installation Tips for UK Homes
Golf Simulator Room Setup: Installation Tips for UK Homes
Transforming your spare room, garage, or loft into a professional golf simulator space requires careful planning and attention to detail. Whether you’re a weekend warrior looking to improve your handicap or a serious golfer preparing for tournament season, proper golf simulator room setup can make the difference between a frustrating experience and a game-changing practice facility.
This comprehensive guide covers everything you need to know about creating the perfect golf simulator environment in your UK home. From essential room dimensions and lighting considerations to equipment placement and installation tips, we’ll walk you through each step of the process. You’ll discover how to optimise your space for accuracy, safety, and enjoyment whilst avoiding common pitfalls that can derail your project.
By the end of this guide, you’ll have a clear roadmap for setting up a professional-quality golf simulator room that delivers years of reliable performance and helps you improve your game from the comfort of your own home.
Essential Room Dimensions and Space Requirements
The foundation of any successful golf simulator room setup begins with adequate space. Understanding the minimum and recommended dimensions will help you determine whether your chosen location can accommodate a proper installation.
Minimum Space Requirements
For a functional golf simulator setup, you’ll need a minimum ceiling height of 2.7 metres (9 feet) to accommodate most golfers’ full swing with a driver. However, taller players or those with particularly upright swings may require up to 3 metres (10 feet) of clearance.
The recommended minimum room dimensions are:
– Length: 4.5 metres (15 feet)
– Width: 3 metres (10 feet)
– Height: 2.7-3 metres (9-10 feet)
These dimensions provide enough space for the golfer to swing comfortably whilst maintaining safe distances from walls and equipment.
Optimal Room Dimensions
Whilst minimum dimensions work, optimal spacing significantly improves the experience:
– Length: 5.5-6 metres (18-20 feet)
– Width: 4-4.5 metres (13-15 feet)
– Height: 3-3.5 metres (10-11.5 feet)
Larger spaces allow for better equipment placement, reduce the risk of club strikes against walls, and create a more immersive golfing environment.
Zone Planning
Divide your room into three distinct zones:
- Hitting Zone: 2.5 metres deep, centred on your striking position
- Equipment Zone: 1.5-2 metres behind the hitting zone for launch monitors and safety
- Screen Zone: 2-3 metres in front of the hitting position for impact screen and projection
Lighting Design and Installation
Proper lighting is crucial for both safety and launch monitor accuracy. Poor lighting can create shadows that interfere with ball tracking, whilst excessive brightness can wash out projected images.
Light Placement Strategies
Position lights to eliminate shadows in the hitting zone whilst avoiding direct illumination of the impact screen. The ideal setup includes:
- Overhead lighting: LED panels or recessed lights positioned 1-1.5 metres behind the golfer
- Side lighting: Wall-mounted fixtures at shoulder height to fill in shadows
- Ambient lighting: Dimmable options for general room illumination
Avoiding Launch Monitor Interference
Certain lighting types can interfere with radar and camera-based launch monitors:
- Use LED lights with consistent colour temperature (5000K-6500K)
- Avoid fluorescent fixtures that can create flickering
- Position lights to prevent direct glare into camera-based systems
- Install dimmer switches for different lighting scenarios
Recommended Lighting Equipment
For optimal performance, consider professional-grade lighting solutions designed specifically for golf simulator environments. These typically feature adjustable brightness, proper colour temperature, and minimal electronic interference.
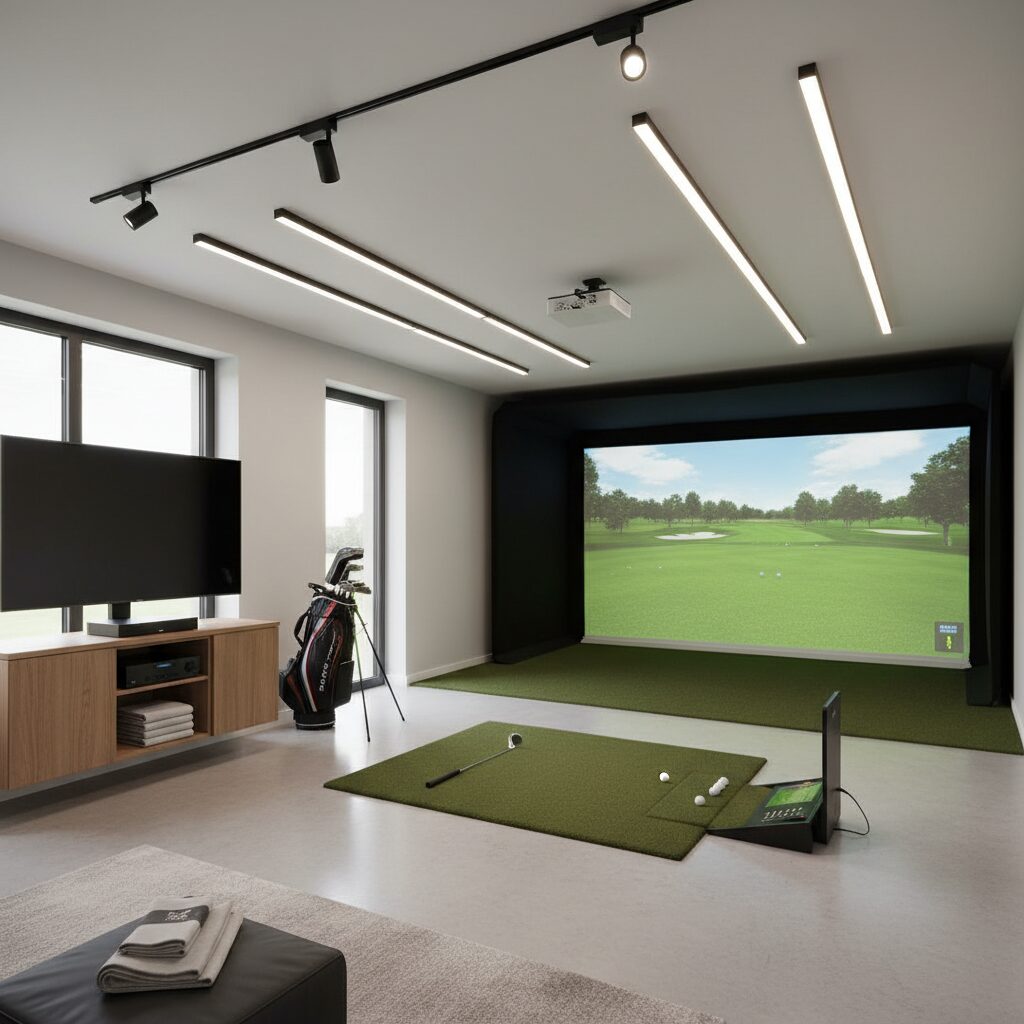
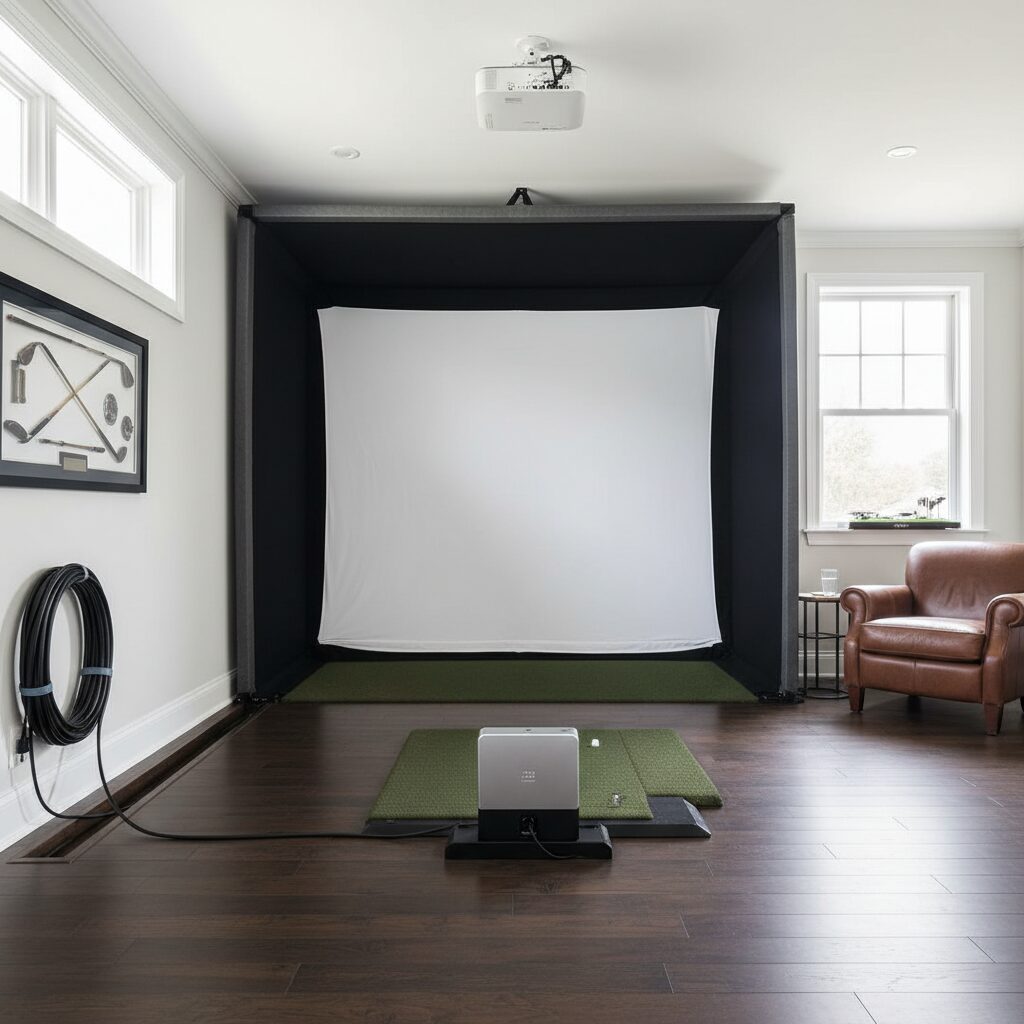
Flooring Solutions and Installation
The right flooring provides stability, comfort, and realistic playing conditions whilst protecting your existing floor surface.
Flooring Types
Artificial Turf Systems: Premium turf with built-in tee areas offers the most realistic experience. Look for systems with:
– Multiple grass lengths for different lie conditions
– Integrated tee boxes at various heights
– Shock-absorbing backing for joint comfort
– Easy-to-replace hitting strips
Modular Tile Systems: Interlocking tiles provide flexibility and easy maintenance:
– Simple installation over existing floors
– Individual tile replacement when worn
– Various textures and colours available
– Good for rooms with irregular shapes
Professional Strike Mats: High-quality strike mats designed for repeated use:
– Realistic turf surface
– Shock absorption for club protection
– Portable for easy repositioning
– Cost-effective option for smaller spaces
Installation Considerations
- Ensure level subfloor before installation
- Leave expansion gaps around perimeter
- Use appropriate adhesives for permanent installations
- Consider moisture barriers in basement or garage locations
- Plan for easy access to utilities beneath flooring
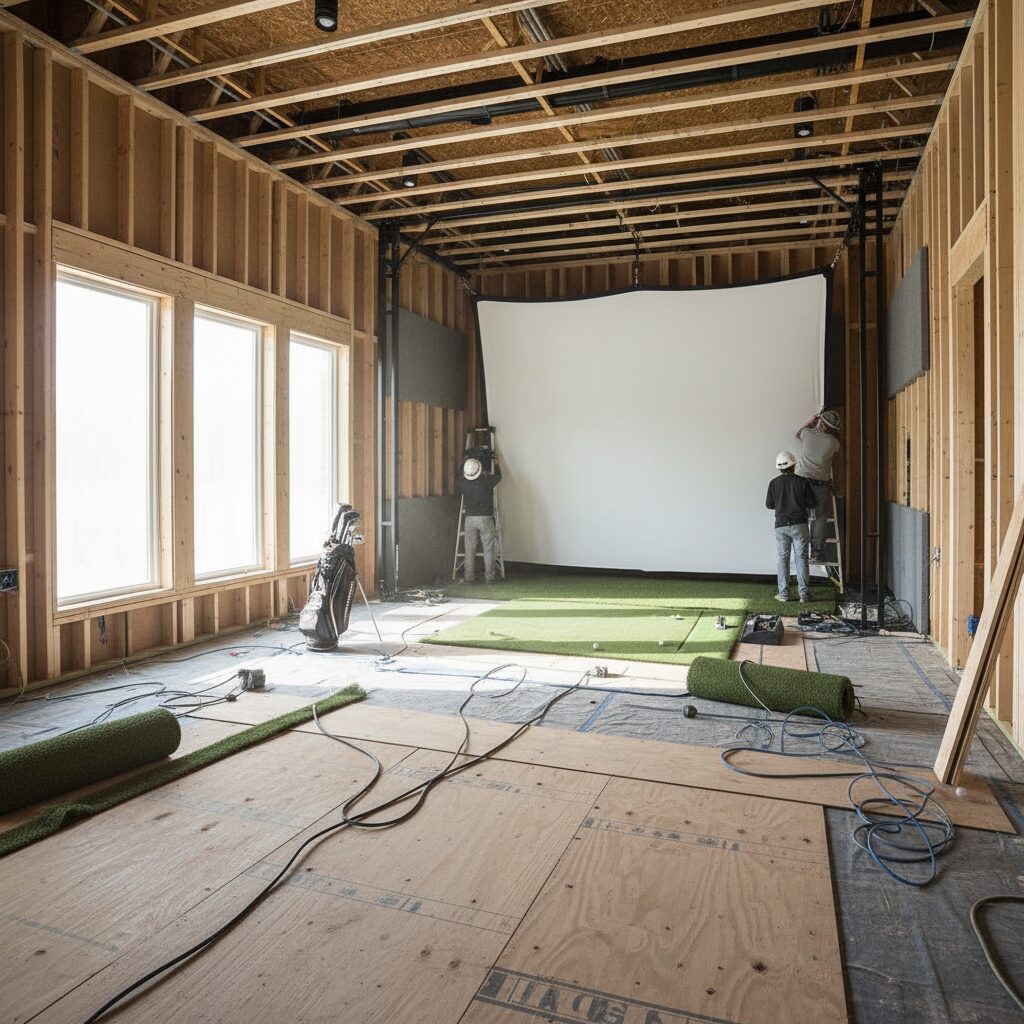
Equipment Placement and Safety
Strategic equipment placement maximises accuracy whilst ensuring user safety and equipment protection.
Launch Monitor Positioning
Different launch monitor technologies require specific positioning:
Radar-Based Systems (FlightScope, etc.):
– Position 2-3 metres behind the golfer
– Ensure clear line of sight to ball flight
– Avoid metallic objects in tracking path
– Mount at appropriate height per manufacturer specifications
Camera-Based Systems (Foresight Sports, etc.):
– Position per manufacturer’s guidelines (typically overhead or to the side)
– Ensure adequate lighting without glare
– Keep lens clean and unobstructed
– Consider protective housings in high-traffic areas
Impact Screen Setup
Proper impact screen installation is critical for safety and longevity:
- Mount screen with appropriate tension – not too tight or loose
- Ensure adequate clearance from walls and projector
- Use proper mounting hardware rated for screen weight
- Consider retractable systems for multi-use rooms
- Install safety netting if screen is close to walls
Safety Considerations
- Install protective netting along side walls
- Ensure adequate clearance for full golf swings
- Use proper lighting to illuminate hazards
- Keep equipment cables organised and protected
- Install emergency lighting for power outages
Technology Integration and Wiring
Modern golf simulators require careful integration of multiple technologies, from launch monitors to projection systems and audio equipment.
Power Requirements
Plan electrical requirements early in your setup:
- Dedicated circuits for high-power projectors
- Adequate outlets for all equipment
- Surge protection for sensitive electronics
- Consider UPS systems for critical components
- GFCI protection in garage or basement installations
Network Connectivity
Reliable internet connectivity enables:
– Software updates for simulator programs
– Online play and competitions
– Remote monitoring and support
– Streaming services for entertainment
Install ethernet connections where possible, with Wi-Fi as backup.
Cable Management
- Use conduit or cable trays for permanent installations
- Label all connections for easy troubleshooting
- Allow adequate service loops for equipment maintenance
- Separate power and data cables to prevent interference
- Plan for future upgrades and additional equipment
Audio Integration
Quality audio enhances the simulation experience:
– Position speakers for optimal sound distribution
– Consider subwoofers for realistic impact sounds
– Install volume controls accessible from hitting position
– Use appropriate speakers and soundbars designed for golf simulator environments
Climate Control and Ventilation
Maintaining proper environmental conditions ensures equipment longevity and user comfort.
Temperature Control
Electronic equipment generates significant heat:
– Maintain room temperature between 18-24°C (65-75°F)
– Install adequate ventilation for equipment cooling
– Consider dedicated HVAC zones for simulator rooms
– Use fans to improve air circulation
– Monitor humidity levels to prevent condensation
Ventilation Requirements
- Provide fresh air exchange to prevent stuffiness
- Install exhaust fans if room lacks natural ventilation
- Consider air filtration to protect sensitive equipment
- Ensure proper ventilation around projectors and computers
Moisture Management
- Install vapour barriers in basement installations
- Use dehumidifiers if necessary to maintain 40-60% humidity
- Ensure proper drainage around room perimeter
- Monitor for signs of moisture intrusion
| Equipment Item | Purpose | Estimated Cost (£) | Priority Level |
|---|---|---|---|
| Launch Monitor | Ball flight tracking and data | £2,000-£15,000 | Essential |
| Impact Screen | Ball impact and projection surface | £300-£1,500 | Essential |
| Projector | Visual display of simulation | £1,500-£5,000 | Essential |
| Gaming PC | Runs simulation software | £1,000-£3,000 | Essential |
| Hitting Mat | Realistic striking surface | £200-£1,000 | Essential |
| LED Lighting System | Proper illumination | £300-£800 | Important |
| Audio System | Sound enhancement | £200-£1,000 | Important |
| Protective Netting | Safety and equipment protection | £150-£500 | Important |
| Ventilation System | Climate control | £300-£1,200 | Recommended |
| Furniture/Storage | Equipment storage and comfort | £200-£1,500 | Optional |
Professional Installation vs DIY Setup
Deciding between professional installation and DIY setup depends on your technical skills, available time, and budget considerations.
Benefits of Professional Installation
- Expert knowledge of equipment compatibility
- Proper electrical and structural work
- Warranty protection on installation work
- Faster completion timeline
- Professional calibration and testing
DIY Installation Considerations
Suitable for DIY:
– Basic equipment mounting
– Cable organisation
– Software installation and setup
– Simple lighting installation
Require Professional Help:
– Electrical panel upgrades
– Structural modifications
– Complex projector mounting
– Network infrastructure installation
– HVAC modifications
Planning Your Installation
Whether choosing DIY or professional installation:
- Create detailed room measurements and plans
- Research equipment compatibility requirements
- Obtain necessary permits for electrical work
- Plan installation sequence to avoid conflicts
- Test all systems before final setup completion
Many UK homeowners find success with a hybrid approach, handling basic setup themselves whilst hiring professionals for specialised work like electrical installation or structural modifications. Consider exploring golf bundles that include installation support and technical guidance.
Frequently Asked Questions
What is the minimum ceiling height required for a golf simulator room?
The minimum ceiling height for most golfers is 2.7 metres (9 feet), though 3 metres (10 feet) is recommended for taller players or those with upright swings. Measure your highest club swing to ensure adequate clearance plus safety margin.
Can I install a golf simulator in my garage?
Yes, garages make excellent golf simulator locations due to their size and accessibility. However, you’ll need to address insulation, heating, lighting, and electrical requirements. Many UK homeowners successfully convert single or double garages into premium golf simulator spaces.
How much does it cost to set up a golf simulator room?
Total setup costs typically range from £5,000 for basic systems to £25,000+ for premium installations. This includes equipment, room modifications, and installation. Review our golf simulator cost guide for detailed budget planning.
Do I need planning permission for a golf simulator room?
Most internal conversions don’t require planning permission, but you may need building regulations approval for electrical work, structural changes, or conversions that affect the property’s character. Check with your local council before beginning major modifications.
What type of flooring works best for golf simulators?
High-quality artificial turf systems provide the most realistic experience, whilst modular tiles offer flexibility and easy maintenance. The best choice depends on your budget, room type, and performance requirements. Quality strike mats can also provide excellent performance at lower cost.
How do I prevent launch monitor interference?
Use LED lighting with consistent colour temperature, avoid fluorescent fixtures, and position lights according to your launch monitor manufacturer’s guidelines. Keep metallic objects away from radar-based systems and ensure camera-based systems have clear, well-lit sight lines without glare.
Creating the perfect golf simulator room setup requires careful planning, quality equipment, and attention to detail. By following these installation tips and considering your specific space requirements, you’ll be well on your way to enjoying year-round golf practice from the comfort of your home. Remember that proper setup now prevents costly modifications later, making the initial investment in planning and quality components worthwhile for long-term satisfaction.